How to Write Cursive A Uppercase & Lowercase (with PDF Worksheets)
The cursive letter A is the starting point for anyone learning cursive writing. It’s the first letter every learner meets when starting the cursive alphabet. Knowing how to shape it, how it flows on the line, and how it links with other letters helps build strong writing habits from day one.
In this guide, you’ll get clear steps to write both uppercase and lowercase cursive A. With years of classroom experience behind these techniques, the goal here is to keep things simple and easy to follow. You’ll also get a worksheet that’s made for real practice, not just tracing for the sake of it.
Download Worksheets (PDF)
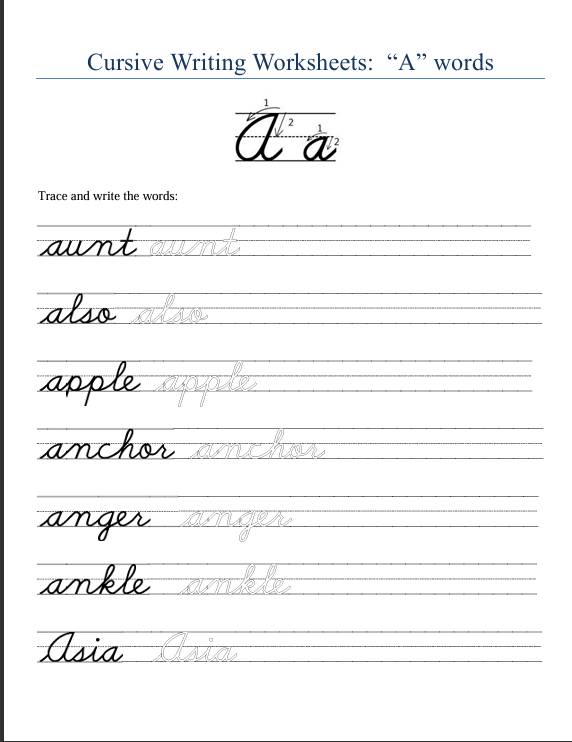
Help your child or students master the letter A in cursive with our free printable worksheets. Designed for beginners, each sheet includes traceable examples, guided practice, and extra space to write independently. Click below to download and print your favorite worksheet.


Next Lesson: Cursive B
How to Write the Cursive Letter “A”?
Writing the cursive letter A starts with learning the right shape and motion. Both uppercase and lowercase A have their own forms, and getting them right helps build a strong base for the rest of the alphabet.
How to Write Lowercase Cursive “a”
Start at the bottom line. Move your pencil up and around in a curved shape, just like the letter “o,” but stop before you close the loop. From there, dip back down and finish with a short tail that moves to the right. That tail helps the letter connect to the next one in a word.

Think of it like drawing a small balloon with a string at the end. The motion is smooth and round, not sharp or rushed.
Tips to keep in mind:
- Keep your strokes light and even.
- Stay between the midline and bottom line.
- Make sure the circle closes neatly without gaps.
Common Mistakes When Writing Cursive Lowercase “a”
While writing cursive “a”, learners often face small issues that affect how smooth and neat the letter looks. Knowing these can help improve handwriting easily.
Common Mistakes:
- Wrong starting curve: Some begin the curve too high or too flat, making the letter look uneven.
- Open loop: Forgetting to close the loop makes it look like a “u” instead of an “a.”
- Uneven join: The tail connecting to the next letter is often too short or too long, breaking the flow.
How to Write Uppercase Cursive A
Uppercase A in cursive starts with a large curve, going up and around from the bottom line to the top. It then swings down with a slant to the left, loops near the bottom, and finishes with a line that crosses from the right side.
This version is more decorative than the lowercase, and it might take a little more time to get used to. Some students say it reminds them of a fancy number 2, but with a stronger loop at the base.

Key points:
- The top curve should be smooth and round.
- The final line crosses neatly near the bottom third of the letter.
- Don’t lift your pencil until the letter is done.
Getting comfortable with these strokes takes practice, but once you learn them, writing cursive A becomes quick and natural. Up next, we’ll show you how to connect cursive A to other letters in real words.
Common Mistakes When Writing Cursive Uppercase “A”
When learning to write cursive uppercase A, students often make small but important errors that affect neatness and flow. Knowing these mistakes helps improve handwriting quickly.
Common Mistakes:
- Starting from the wrong point: Many learners begin too low or too far from the baseline, which makes the letter uneven.
- Incorrect loop size: The top loop is often too small or too large, which breaks the smooth look of the letter.
- Not connecting properly: The tail or exit stroke is sometimes missing or too short, making it hard to link with the next letter.
How to Connect Cursive A to Other Letters
In cursive writing, letters flow into each other without lifting the pencil. This is what makes cursive faster and smoother than print. Knowing how to connect cursive “A” the right way helps you write real words that look neat and easy to read.
There are two ways to connect cursive A: starting from an uppercase A or moving from a lowercase a. Each follows its own pattern.
Practice Words with “a”
How to connect lowercase a:
The lowercase a ends with a small tail that curves slightly to the right. This tail is what links it to the next letter. The key is to make the tail short and smooth — not too low, not too high.

- If the next letter is tall (like b, h, or l), aim the tail upward.
- If the next letter is short (like n, e, or s), keep the tail more level.
Example word connections:
- an: The tail of the a flows directly into the start of n.
- ask: The a connects to the s with a smooth curve, then drops into k.
- art: The round shape of a sets up a clear bridge to r and then t.
Tips:
- Don’t rush the connection. Let the curve lead into the next shape.
- Keep the letters close, but not overlapping.
- Practice word chains like an, art, ask, ant, and app.
How to connect uppercase A:
The uppercase A usually does not connect to the letter before it, because it starts at the bottom line on its own. However, it can connect to the letter that comes after it, depending on the writing style.
- After writing A, continue the stroke smoothly into the next lowercase letter.
- The ending tail of A becomes the lead-in stroke for the next letter.
Example names:
- Adam: The A loops into d without lifting the pencil.
- Alice: The A leads straight into l in one motion.
- April: The tail of A turns upward into p.
Take your time connecting letters. If the flow feels off, it usually means the stroke was too sharp or angled. Keep your lines round and steady, and always aim for smooth motion.
Practice Techniques for Writing Cursive A
Writing cursive isn’t just about copying shapes, it’s about training your hand to move with control. These techniques help build comfort and flow when writing both uppercase and lowercase cursive A.
1- Finger Tracing Before Pencil Work
Before touching a pencil, try using your finger. This builds motion memory without pressure.
- Trace the letter A in the air, on your desk, or on your palm.
- Use big arm movements to build the motion, especially for uppercase A.
- Say the stroke steps aloud as you trace: “up, around, back, cross.”
This method works well for young kids or beginners who feel tense holding a pencil. It gives them a feel for the motion first.
2- Using the Right Pencil Grip and Paper Position
How you hold the pencil and place the paper affects your control.
- Use a three-finger grip — thumb and pointer on the sides, middle finger below.
- Hold the pencil loosely. Your hand shouldn’t cramp.
- Tilt the paper slightly to the left (or right for left-handed writers).
- Keep your wrist low and relaxed. Don’t press too hard.
If the pencil feels too slippery or small, try a grip sleeve. It helps guide proper finger placement without forcing it.
3- Writing with Rhythm and Line Awareness
Don’t rush. Cursive writing is like walking with purpose not running.
- Follow the baseline and midline carefully. These lines guide your height and curves.
- Make each letter smooth and even. Avoid sharp points or flat loops.
- Count each stroke silently to keep a steady pace.
Practice five to ten letters in a row, then pause and look at your work. You’ll spot where the shape drifted or where a loop got too wide.
With these small habits, writing cursive A gets easier every time. Next, we’ll use what you’ve learned and put it into action by writing real words and short sentences with the letter A.
Daily Cursive Practice Plan for Letter A
A little practice each day goes further than cramming it all into one long session. This five-day plan helps build steady progress with the cursive letter A. It’s simple to follow, takes only a few minutes each day, and gives your hand time to build muscle memory.

One Comment