How to Write Cursive Alphabets: A to Z
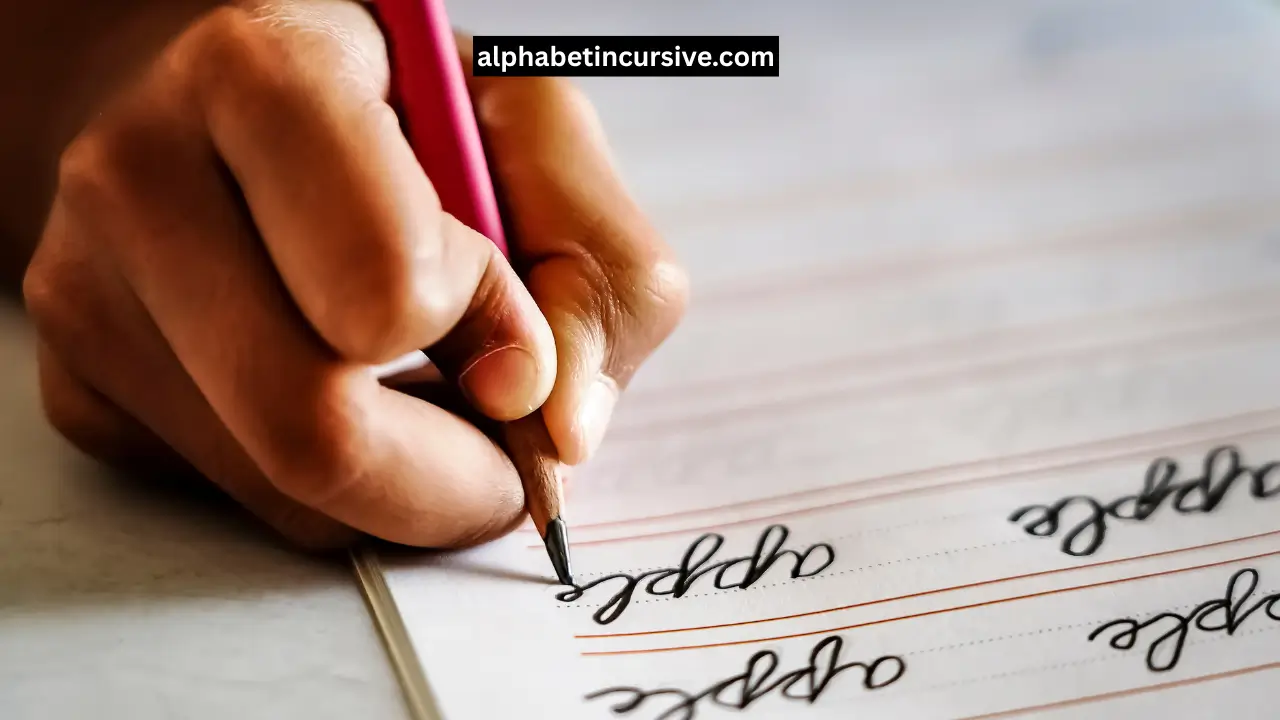
The cursive alphabet is a style of writing where each letter connects smoothly to the next. It’s used to write faster, neater, and with fewer pencil lifts. Learning cursive letters from A to Z helps build strong handwriting habits and better control over letter shapes.
This guide shows you how to write every cursive letter, from uppercase A to lowercase z. Each step explains where to start, which direction to move your pencil, and how to form smooth, connected strokes.
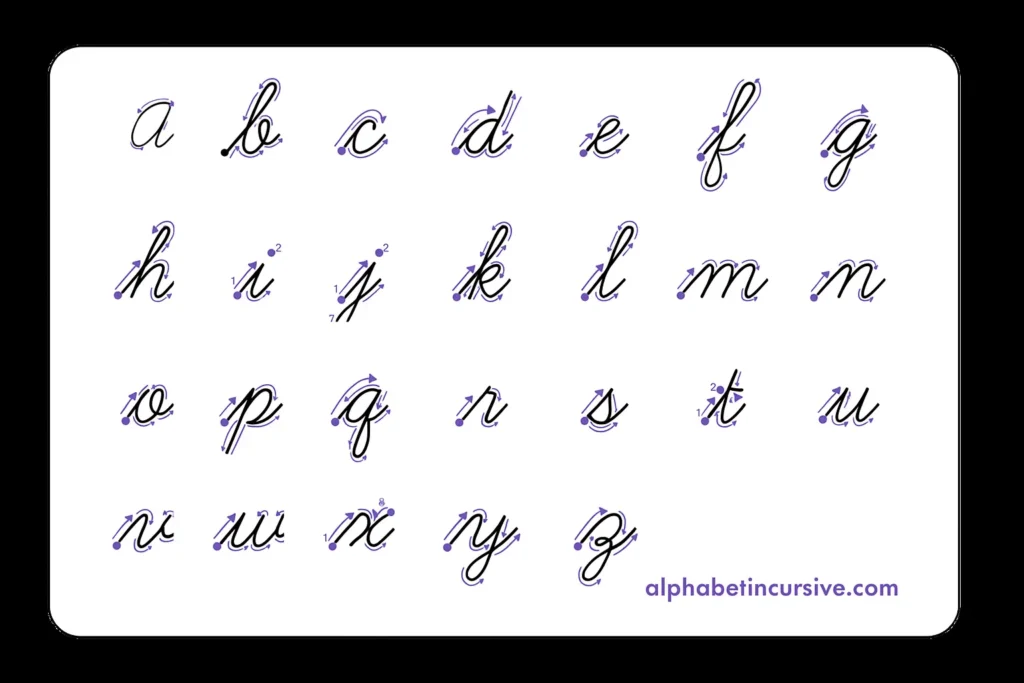
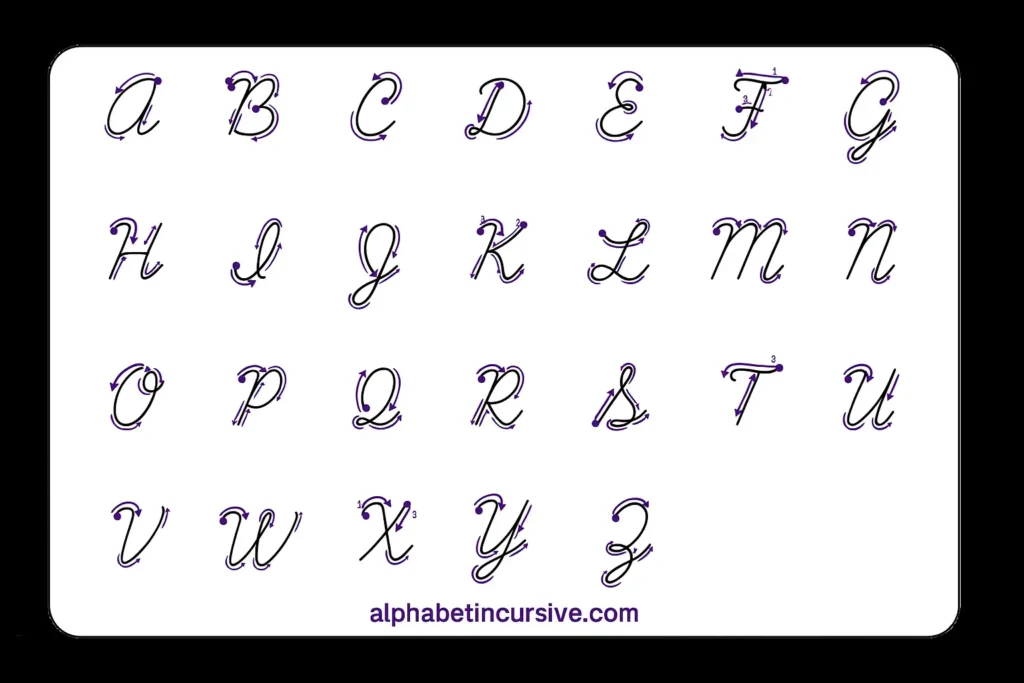
Cursive Alphabet Chart – A Quick Look
The cursive alphabet includes 26 uppercase and 26 lowercase letters, written with connected strokes that flow across the page. Unlike print, cursive letters are designed to join smoothly, making writing quicker and more fluid.
Each letter has a unique shape, but many follow similar patterns. For example, lowercase letters like a, d, g, and q all start with an oval. Uppercase letters often have longer strokes and extra loops, especially with letters like B, F, and H.
Here’s a quick view of the full cursive alphabets:
- Uppercase: A B C D E F G H I J K L M N O P Q R S T U V W X Y Z
- Lowercase: a b c d e f g h i j k l m n o p q r s t u v w x y z
How to Write the Cursive Alphabets Step by Step
To write the cursive alphabet correctly, you need to learn the shape, slant, and stroke order for each letter. Each letter follows a specific motion, and getting that motion right is what helps build good handwriting skills.
Step 1: Start with Lowercase Letters
Begin with lowercase letters because they are easier and used more often. Focus on letters that share similar strokes like a, c, d, g, o, and q.
Step 2: Use Lined Paper or Worksheets
Practice on lined paper to keep letter height and slant consistent. Dotted tracing worksheets help you stay on track while learning the strokes.
Step 3: Learn Letters in Shape Groups
Group similar letters together to build muscle memory faster. For example:
- Oval group: a, o, c
- Loop group: b, e, f, h, k, l
- Curve group: m, n, u, v, w, y
Step 4: Practice Uppercase Letters Separately
Uppercase cursive letters often have longer loops and more complex starts. Begin with simpler ones like C, L, and U, then move to trickier ones like G, Q, and Z.
Step 5: Focus on Pencil Movement
Cursive writing relies on smooth, flowing motion. Each letter should be written in one continuous stroke without lifting the pencil.
Step 6: Repeat and Connect Letters
Once individual letters feel natural, begin connecting them into short words. Start with two-letter combinations, then work up to full words and sentences.
Rules of Cursive Writing
Cursive writing follows a set of rules that help keep each letter smooth, connected, and consistent. These rules make the writing easier to read and faster to write once you get the hang of it.
- Start at the base line: Most letters begin at the bottom writing line.
- Keep letters connected: Lowercase letters should join without lifting your pencil.
- Maintain a right slant: A slight forward tilt keeps writing neat and consistent.
- Use one continuous stroke: Don’t stop mid-letter unless the shape requires it.
- Keep spacing even: Letters should touch, not overlap; words need clear gaps.
How to Write Cursive Letters A to Z
Cursive Letter “A” Training
Writing the cursive letter A starts with learning the right shape and motion. Both uppercase and lowercase A have their own forms, and getting them right helps build a strong base for the rest of the alphabet.
How to Write Lowercase Cursive “a”

Start at the bottom line. Move your pencil up and around in a curved shape, just like the letter “o,” but stop before you close the loop. From there, dip back down and finish with a short tail that moves to the right. That tail helps the letter connect to the next one in a word.
How to Write Uppercase Cursive A

Uppercase A in cursive starts with a large curve, going up and around from the bottom line to the top. It then swings down with a slant to the left, loops near the bottom, and finishes with a line that crosses from the right side.
Cursive Letter “B” Training
The letter B has a tall, strong shape in cursive. It stands out on the page and uses big, rounded strokes. You’ll need a steady hand and a little patience, but once you get the movement right, it feels smooth to write.
How to Write Lowercase Cursive b

Start on the bottom line. Make a straight stroke up to the top line, then bring it straight back down. From there, curve out to the right, loop around halfway up, and finish with a small tail that moves right.
How to Write Uppercase Cursive B

This letter begins with a long upward stroke. After reaching the top line, you come back down, then make two loops one large at the top, one smaller at the bottom.
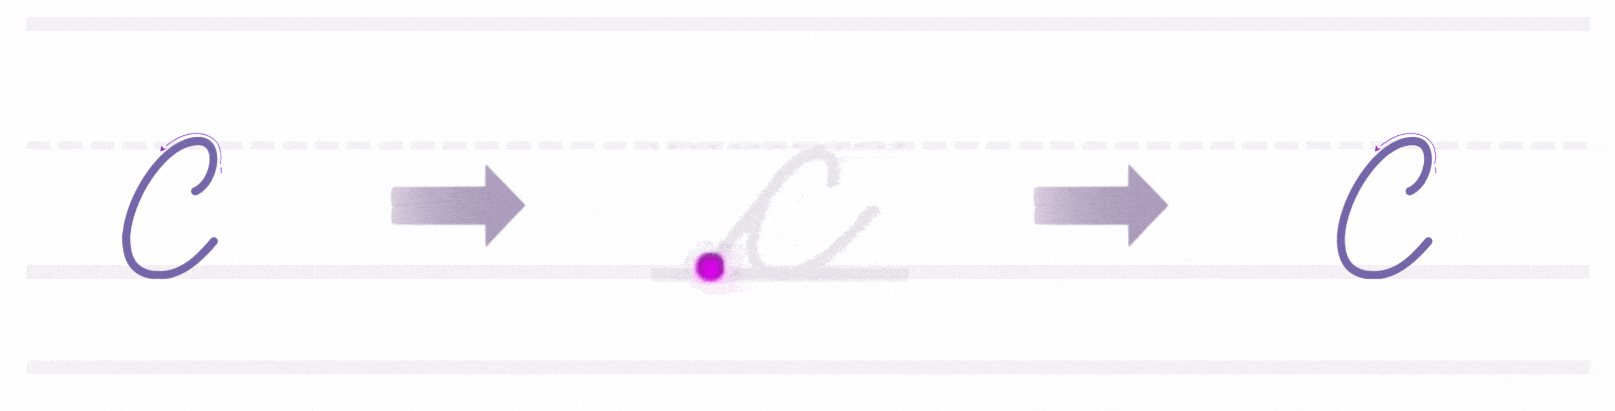
Cursive Letter “C” Training
The letter c in cursive is small, curved, and smooth. It’s one of the easiest letters to start with because it doesn’t need any sharp turns or complex loops.
How to Write Lowercase Cursive c?
Start at the bottom line. Move up slightly in a rightward curve. Swing left to make an open curve, like a small “o” that doesn’t close. Curve back down to the bottom line. Finish with a light tail that moves out to the right to join the next letter.
How to Write Uppercase Cursive C

Begin just below the top line. Curve up slightly, then swing left in a wide arc. Loop down and around to the left, forming a large open shape. Let the stroke curve gently upward as it ends just above the bottom line.
Cursive Letter “D” Training
To write the cursive letter D, you need to know how both versions of the letter work. Each one starts with a different stroke and follows a smooth path.
How to Write Lowercase Cursive D?

The lowercase cursive d begins at the baseline, just like many other small letters. You start by making a small loop upward, then swing it around into a tall curve that touches the top line. From there, you come straight down and finish with a soft tail that curves slightly to the right.
How to Write Uppercase Cursive D

The uppercase cursive D starts with a tall upward stroke that reaches the top line. Once you get to the top, you curve slightly left, then swing your pencil in a wide loop that comes around and touches the baseline. It should look strong and smooth, not stiff or wobbly.
Cursive Letter “E” Training
The cursive letter E has a smooth, round shape. Its looped form is a key component in many other letters and connections. Here’s a simple breakdown of the strokes involved:
How to Write Lowercase Cursive E

Think of the lowercase ‘e’ as a single, graceful movement: Start at the baseline. Sweep up to the midline. Loop back and around to the left. Cross the initial stroke. Continue down and out to form the connecting tail.
How to Write Uppercase Cursive E

Practice writing the uppercase “E” in a single, smooth movement without lifting your pen: Start just below the top line. Loop up and around to the midline. Flow into a second, larger loop down to the baseline. Finish with a connecting stroke.
Cursive Letter “F” Training
The cursive letter F has a unique flow that sets it apart from many other letters in the alphabet. Start with one form at a time and give your hand space to build the right motion.
How to Write Lowercase Cursive F

The lowercase cursive f begins just below the middle writing line. Start with a small upward stroke that touches the top line. From the top, curve the stroke back down in a straight line through the baseline.
At the bottom, create a small loop that curves to the left, then bring the stroke up again just past the midline. Finish with a slight curve to the right, preparing to connect to the next letter.
How to Write Uppercase Cursive F

The uppercase cursive F begins at the top line with a rightward loop. Start by forming a small loop toward the right from the top line, then curve it back to the left and move the stroke downward.
Pull the stroke down in a straight vertical line until it reaches the baseline. Once it hits the bottom, create a short leftward curve that mirrors the top loop. Add two crossbars one across the top loop, and another across the middle section of the downstroke.
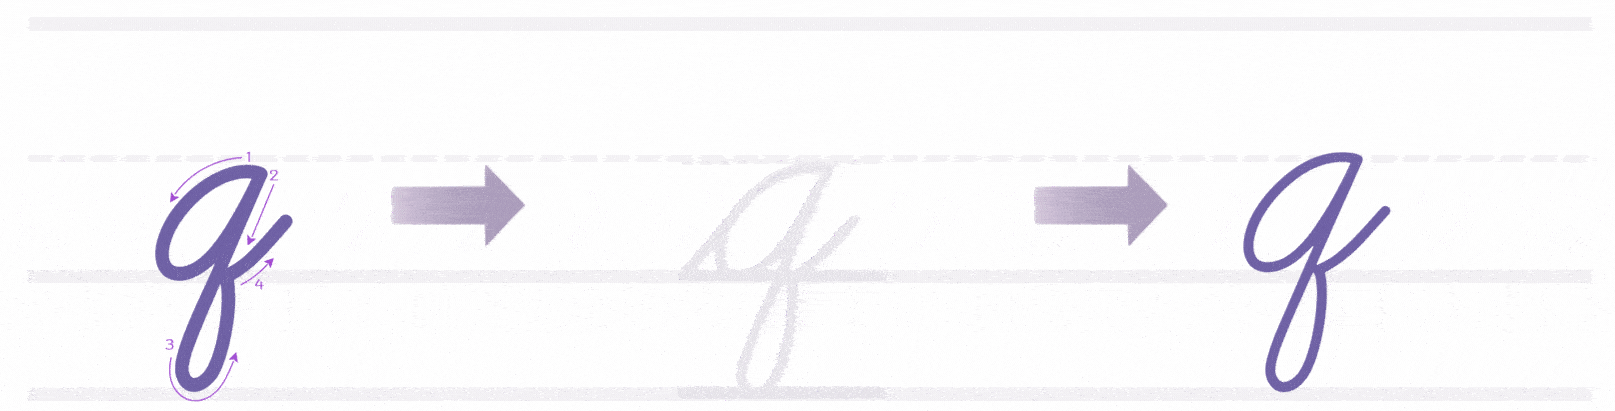
Cursive Letter “G” Training
Cursive G looks different from its print version. It has smooth curves and a looped stroke that makes it stand out.
How to Write Lowercase Cursive G

Start with a curved stroke that looks like the letter a. Begin just below the midline Curve up to the midline and around to the left Close the loop by touching back at the starting point Pull the line straight down past the baseline Loop to the left and bring the tail back up, finishing just above the baseline
How to Write Uppercase Cursive G

Start just below the top line Curve up and to the left in a big circle Curve back down and right, just like cursive C Make a small inner loop, moving left then up Finish with a soft right stroke, ready to connect if needed
Cursive Letter “H” Training
Learning to write cursive H requires a few clear steps. The lowercase version flows with a soft hump, while the uppercase version keeps tall, vertical lines joined by a small bar.
How to Write Lowercase Cursive H
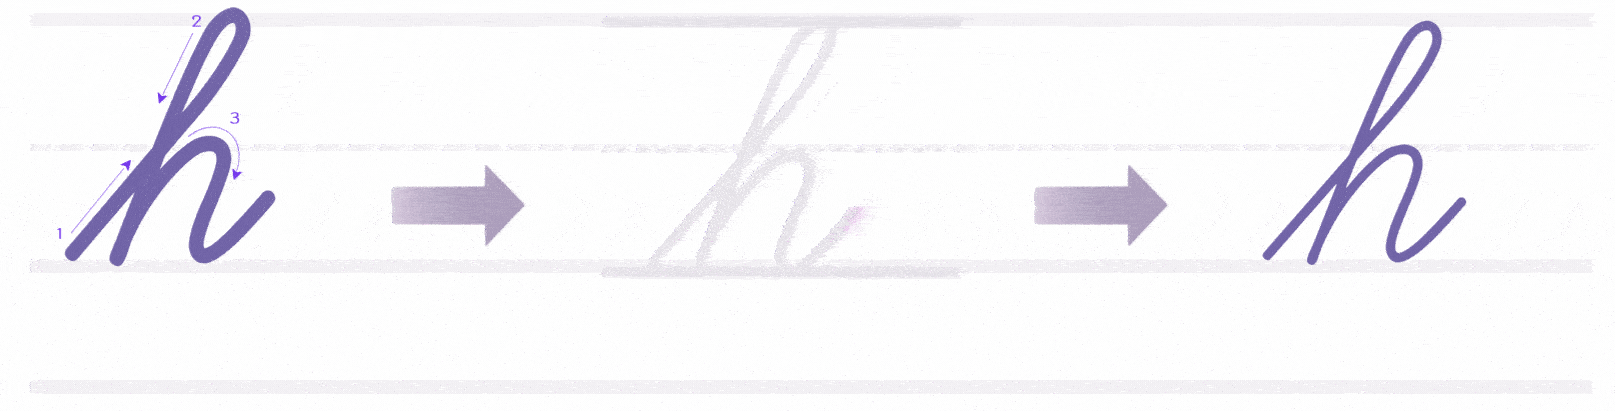
Begin just below the midline Curve up to the top line in a slight slant Pull the line straight down to the baseline Go back up halfway to the midline, then round into a hump Finish with a small tail that leans right, just above the baseline.
How to Write Uppercase Cursive H
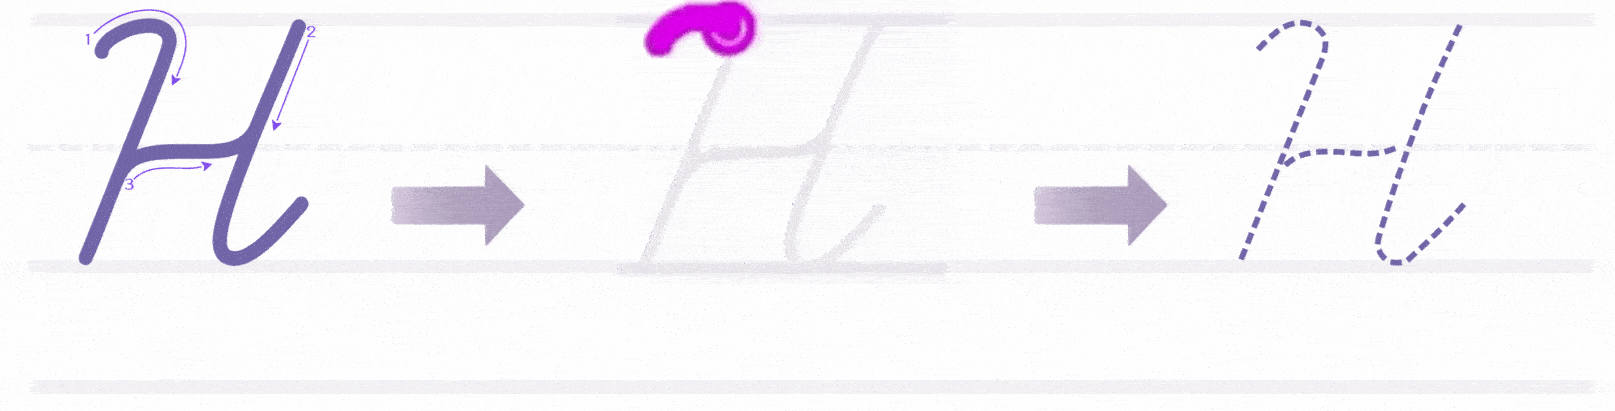
Start at the top line and pull a straight line down to the baseline. Lift your pen and return to the top line, a short distance to the right. Draw a second straight line down to the baseline. Add a small horizontal connector line in the middle between both downstrokes.
Cursive Letter “I” Training
Writing the cursive I starts with learning two forms: lowercase and uppercase. Each has its own stroke style, but both follow a smooth, flowing motion.
How to Write Lowercase Cursive I
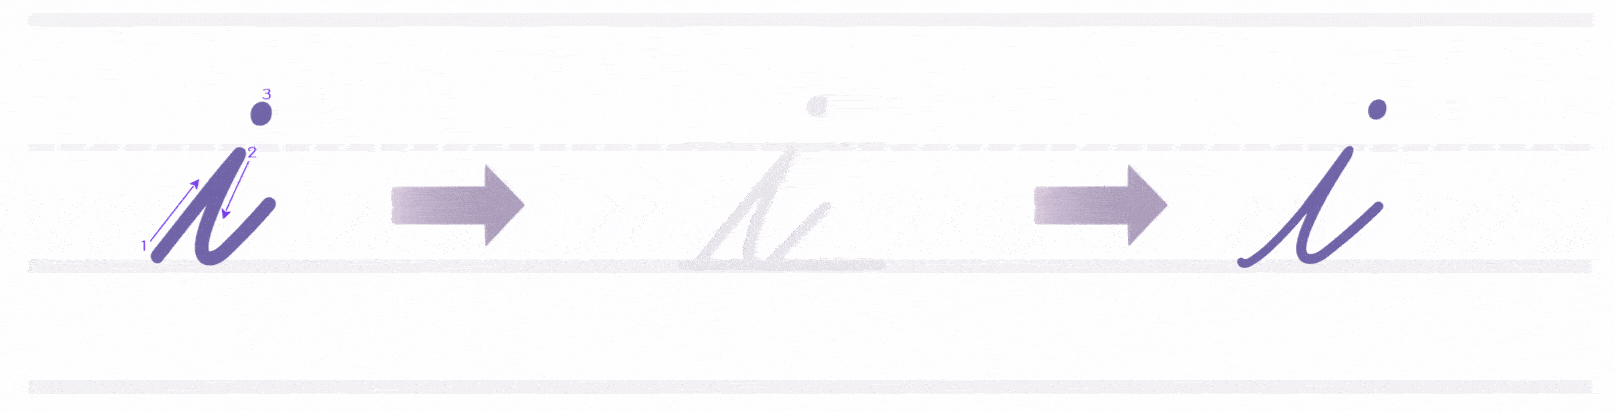
Begin on the baseline with a short upward curve. Move straight up, then curve down gently to form a thin vertical stroke. End with a slight rightward tail to prepare for the next letter. Lift your pen and place a small dot above the midpoint of the stroke.
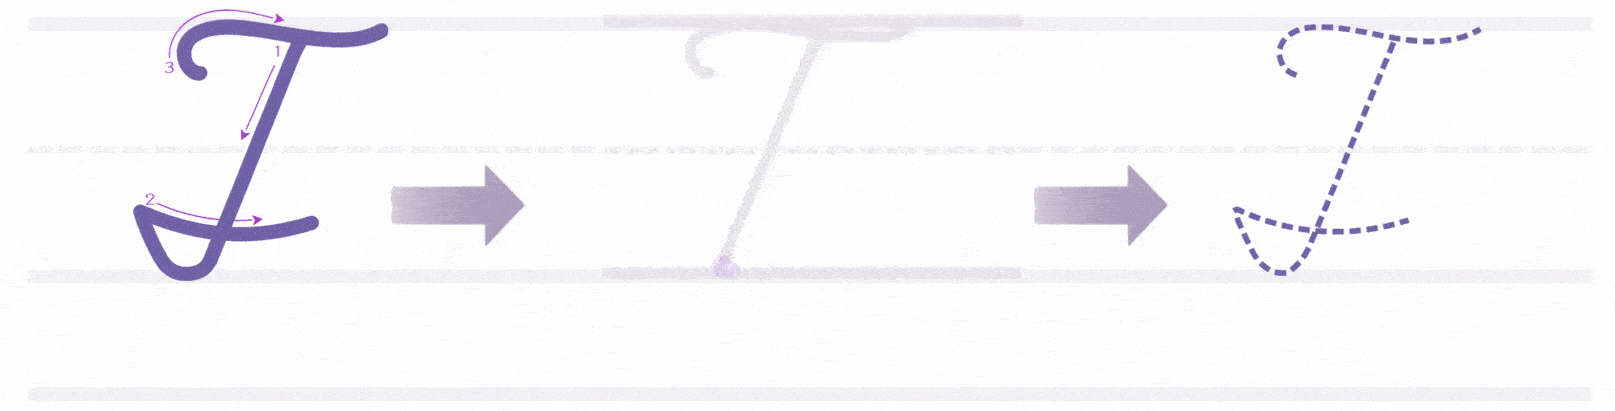
How to Write Uppercase Cursive I
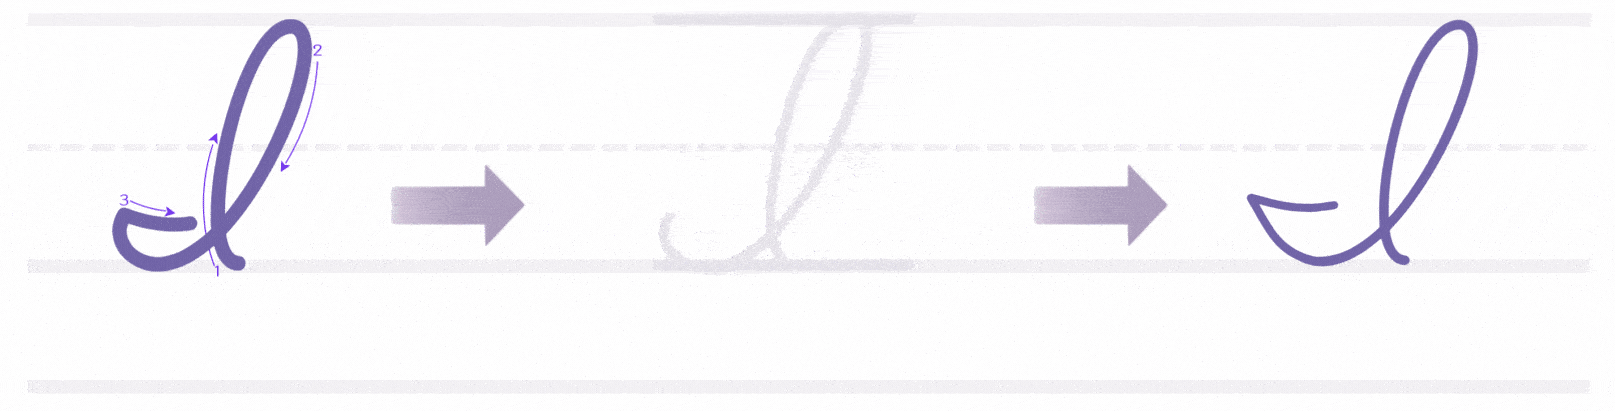
Start with a light upward stroke from the baseline. Curve slightly left, then loop back over to the right and upward. Form a tall vertical line that loops down and ends with a rightward exit stroke. Keep the height consistent with other uppercase letters.
Cursive Letter “J” Training
Cursive J begin with a curved entry stroke, but the lowercase j drops below the baseline, while the uppercase J often includes a taller loop and wider curve.
How to Write Lowercase Cursive J

Begin on the baseline with a short upward curve, just like starting the letter i. Loop slightly up, then curve down and make a straight stroke that drops below the line. Curve to the left at the bottom to create a small hook or tail. Lift your pen and place a small dot above the top of the letter, slightly to the right of the curve.
How to Write Uppercase Cursive J
Start slightly above the midline and curve leftward into a large loop. Bring the stroke down in a straight vertical line, dipping below the baseline. Curl the stroke back to the left and upward into a gentle hook. Finish with a thin exit stroke that curves to the right toward the next letter.
Cursive Letter “K” Training
The cursive letter K has a tall, upright shape with a sharp bend in the middle. Both forms start with a long upward stroke and need careful motion to stay neat.
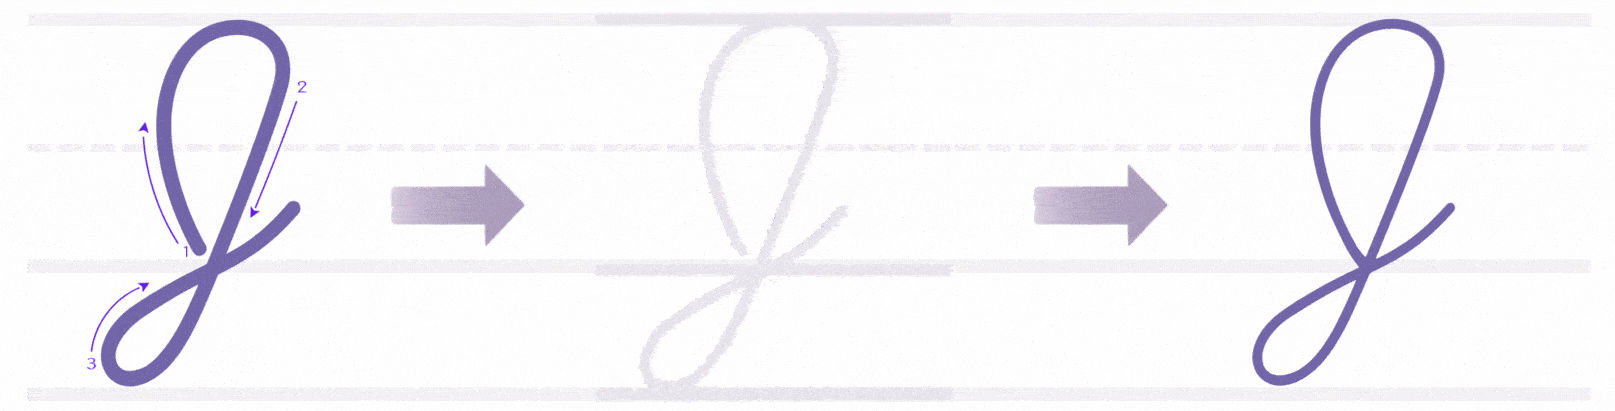
How to Write Lowercase Cursive K
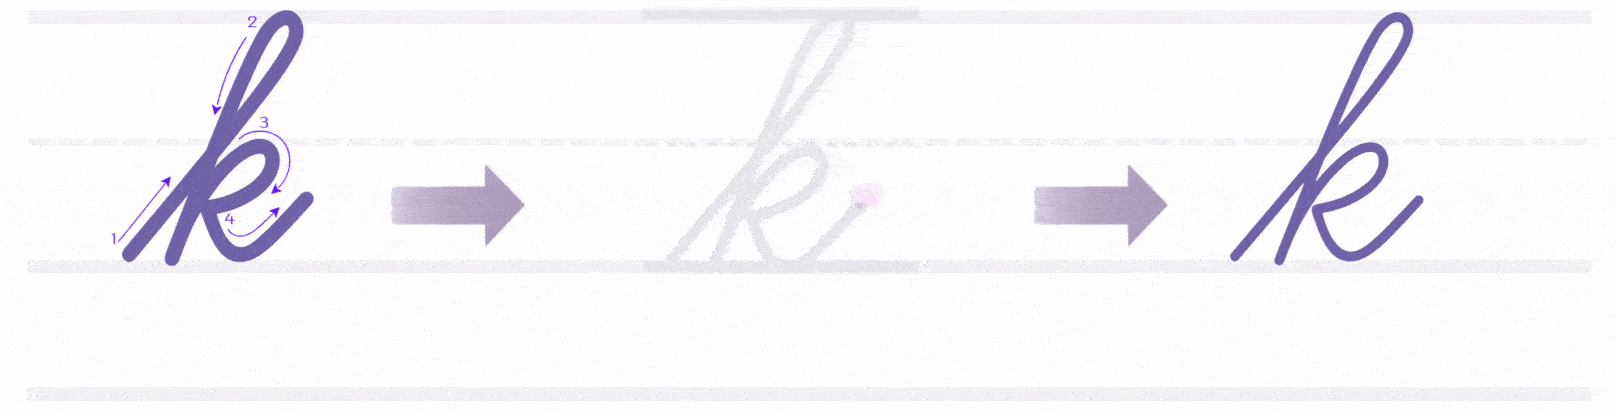
Start at the bottom line Move your pencil up in a tall loop to the top line Pull straight down to the bottom line Without lifting, bring your line back up to the middle At the midline, curve out to the right and hook back in like a small arm Finish with a short exit stroke, ready to connect.
How to Write Uppercase Cursive K
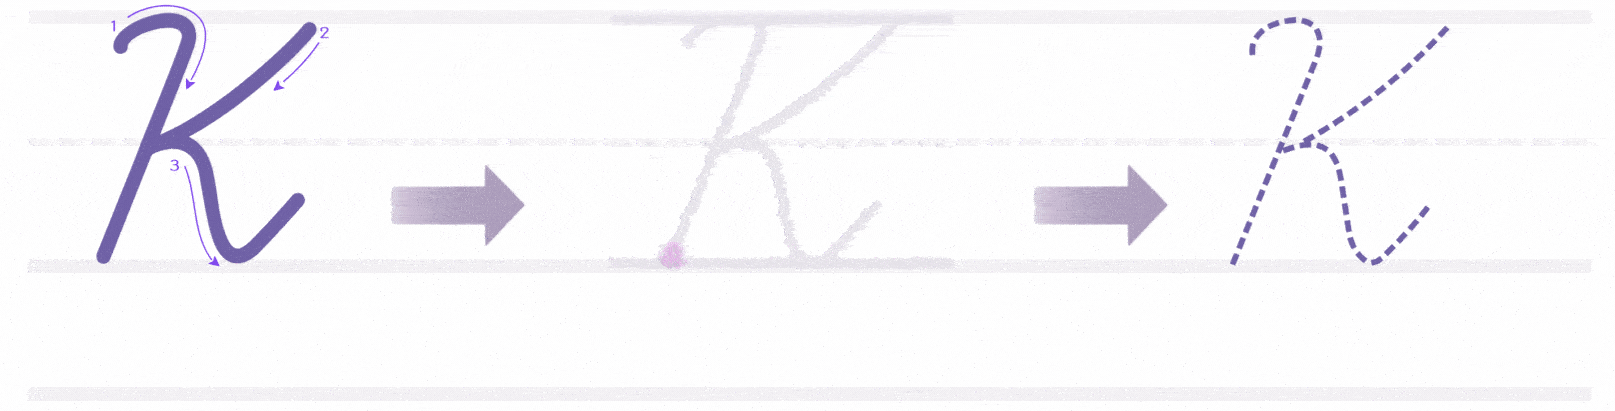
Begin just above the baseline Loop up to the top line and curve around, like starting a cursive L Curve down the left side and stop at the baseline Lift your pencil Start at the middle of the downstroke Swing a small stroke up and right to the top-middle Then draw a slanted line down and back to the baseline, meeting the first stroke.
Cursive Letter “L” Training
Cursive L is tall and smooth. It doesn’t have sharp turns or tight loops, so it’s often taught early when learning cursive. It’s one of the easiest tall letters to learn.
How to Write Lowercase Cursive L
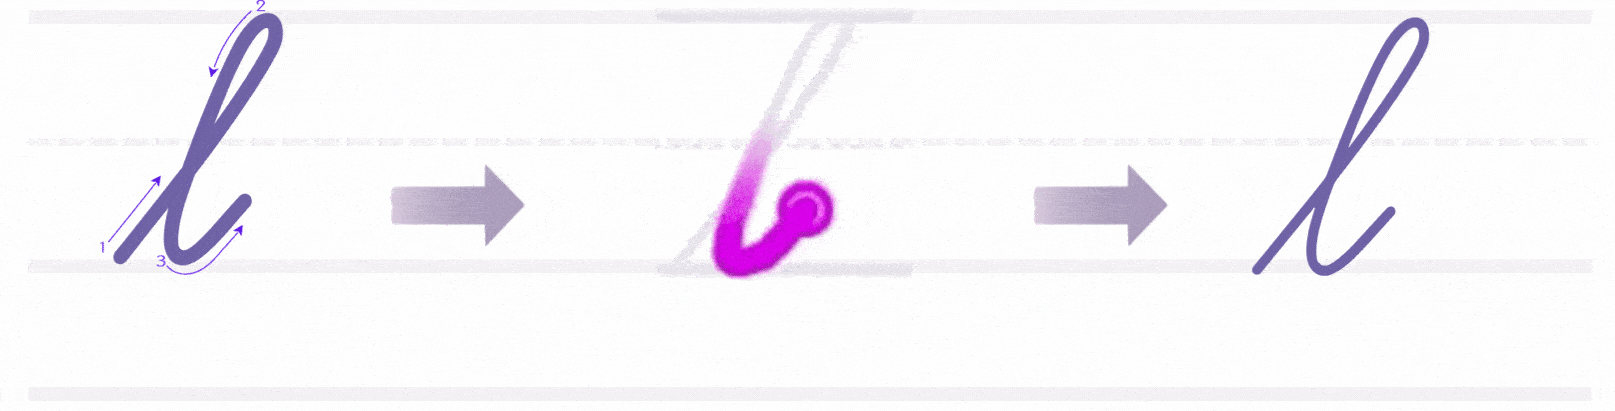
Place your pencil on the bottom line Draw a straight line upward to the top line Curve slightly left at the top to begin a narrow loop Pull your stroke straight back down on the same path Finish with a small rightward curve that moves into the next letter.
How to Write Uppercase Cursive L
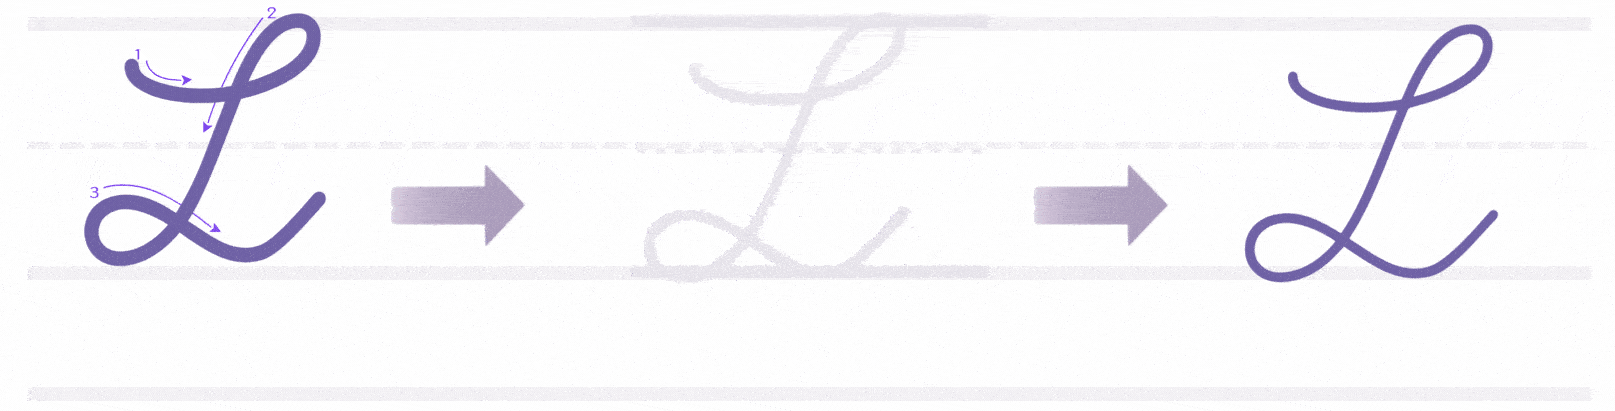
Start slightly above the bottom line Swing your pencil upward toward the top line in a wide curve Reach the top and swing back down with a curve on the left side As you near the bottom, turn the line slightly right into a loop End with a gentle tail that points right, ready for connection if needed.
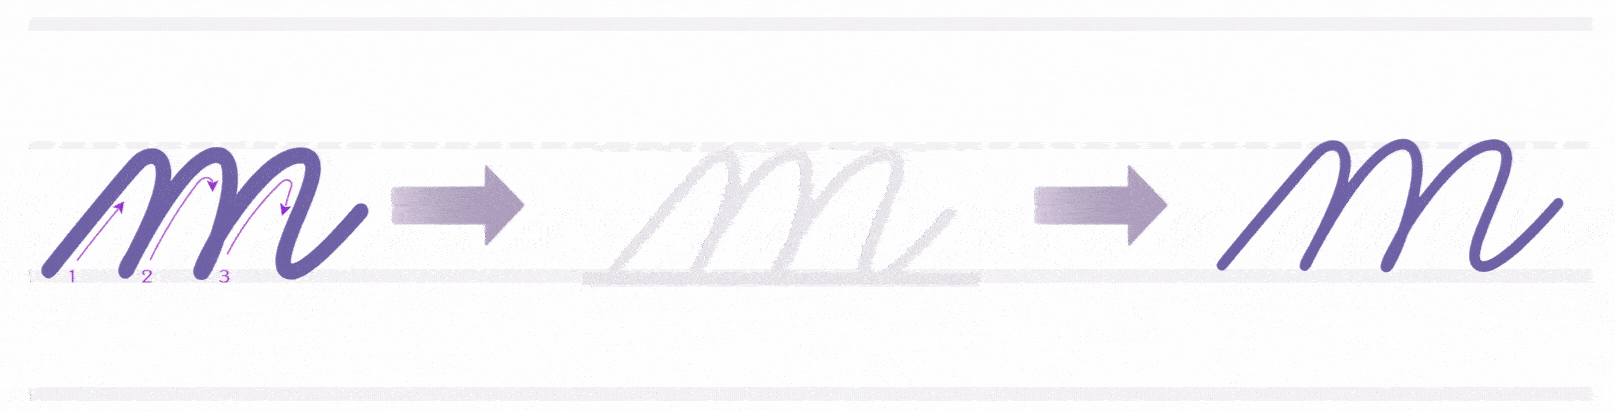
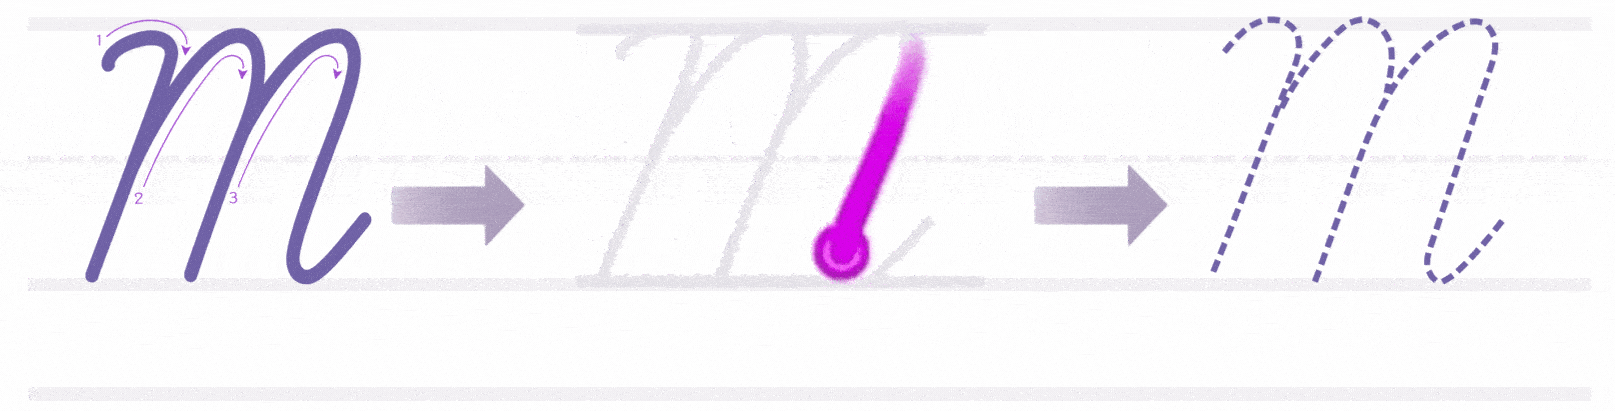
Cursive Letter “M” Training
The cursive letter M moves in waves. It’s one of the few letters that use multiple humps in one stroke.
How to Write Lowercase Cursive M
Start on the baseline Curve up to the midline Drop straight down, then curve back up — that’s your first bump Repeat the same stroke two more times After the third bump, exit with a short rightward stroke to connect to the next letter
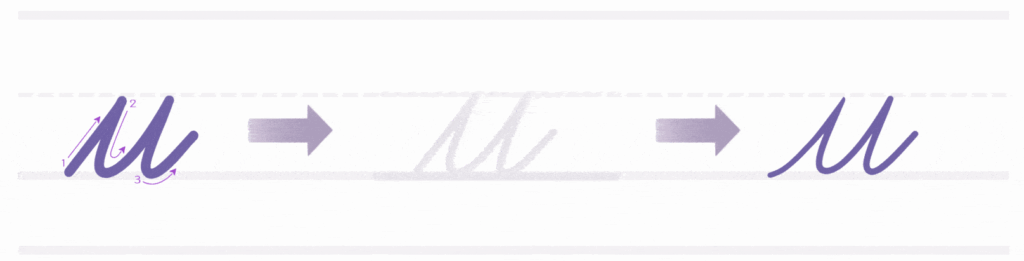
How to Write Uppercase Cursive M
Start just above the baseline Swing up to the top line with a wide curve Come straight down to the baseline Make a sharp turn right and go back up again — not as tall this time Curve slightly left, then dip back down to the baseline again End with a short right-facing exit stroke to begin the next letter (if needed)
Cursive Letter “N” Training
Cursive N has smooth curves and steady rhythm. The lowercase form is short and rounded. The uppercase form is larger, with stronger turns and a bolder look.
How to Write Lowercase Cursive N
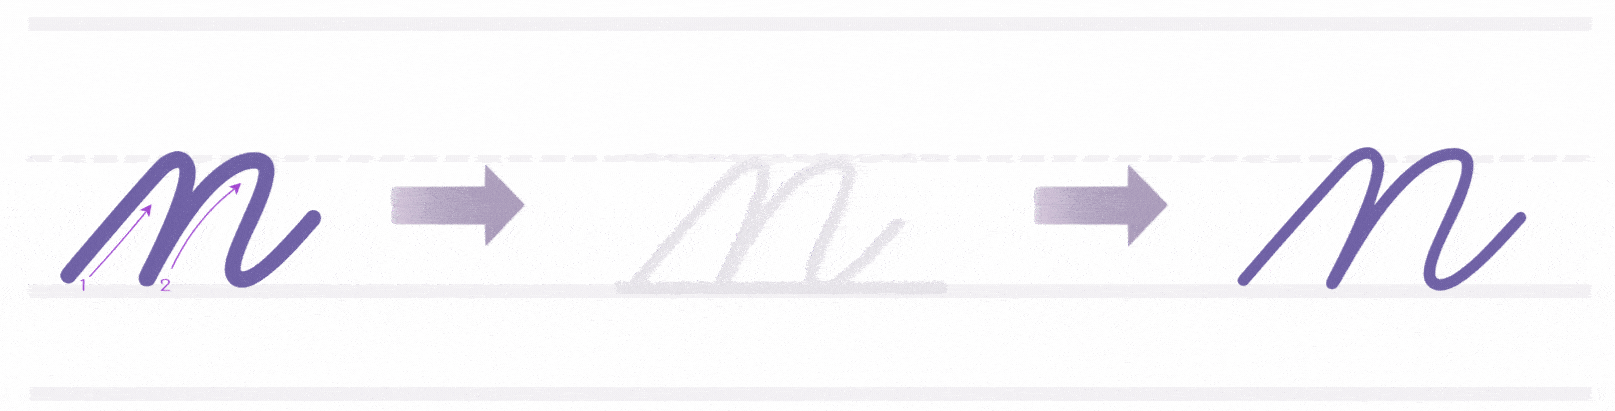
Start at the baseline Curve upward to the midline Drop straight down to the baseline Curve up again to make one full bump Dip back down and finish with a small tail that curves to the right
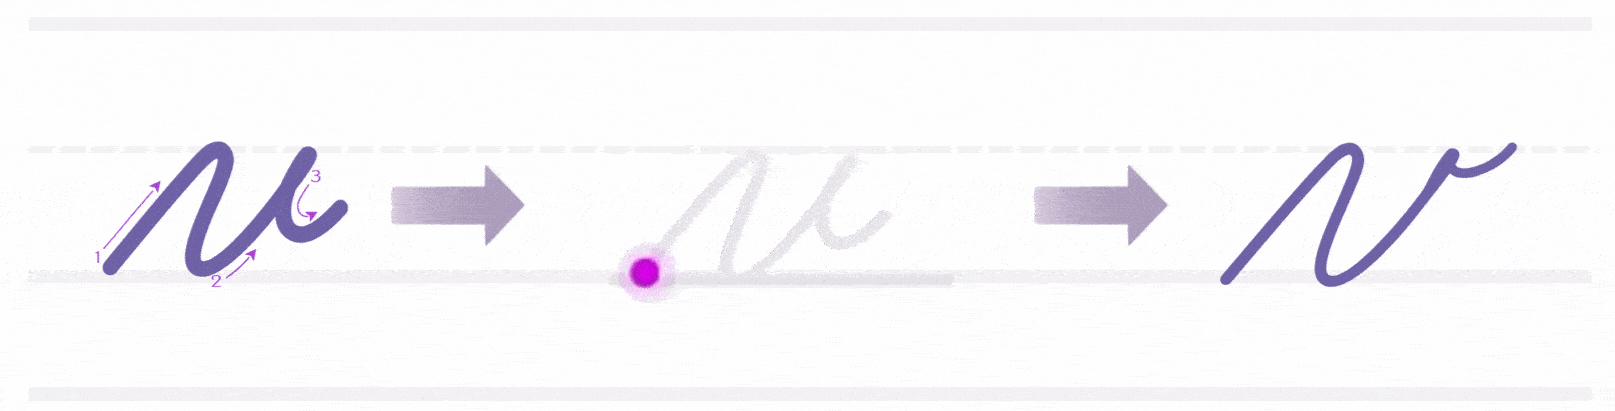
How to Write Uppercase Cursive N
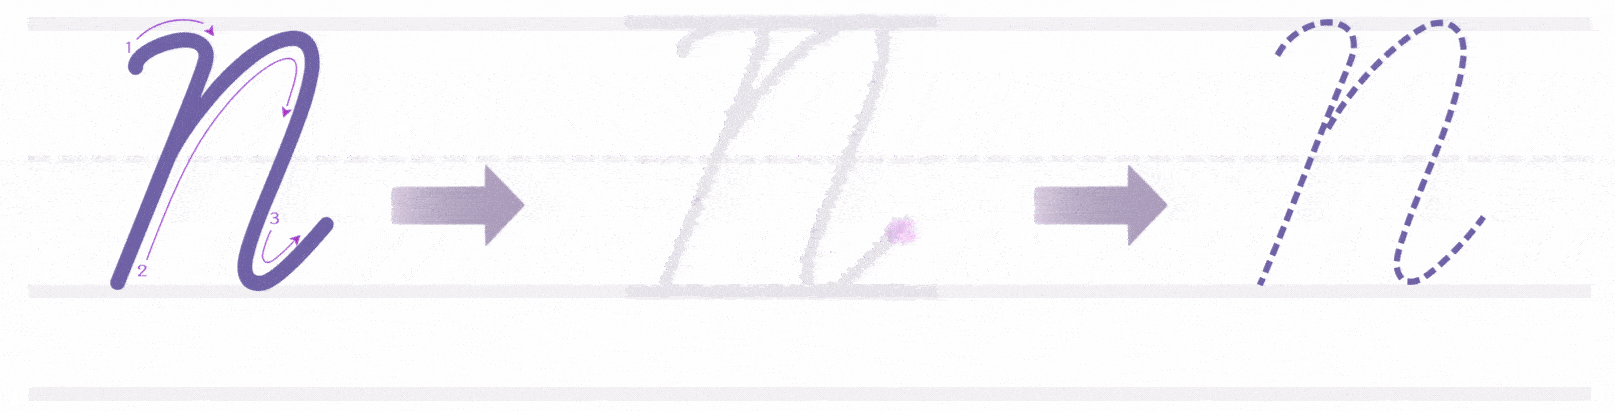
Begin slightly above the baseline Curve up to the top line Drop straight down with a clean stroke Swing left to form a loop or hook near the top Rise up again and make a second curved stroke Drop back down to the baseline Finish with a soft exit curve toward the next letter (if connecting)
Cursive Letter “O” Training
The cursive letter O teaches smooth, circular motion and helps build control for other rounded letters like a and e.
How to Write Lowercase Cursive O
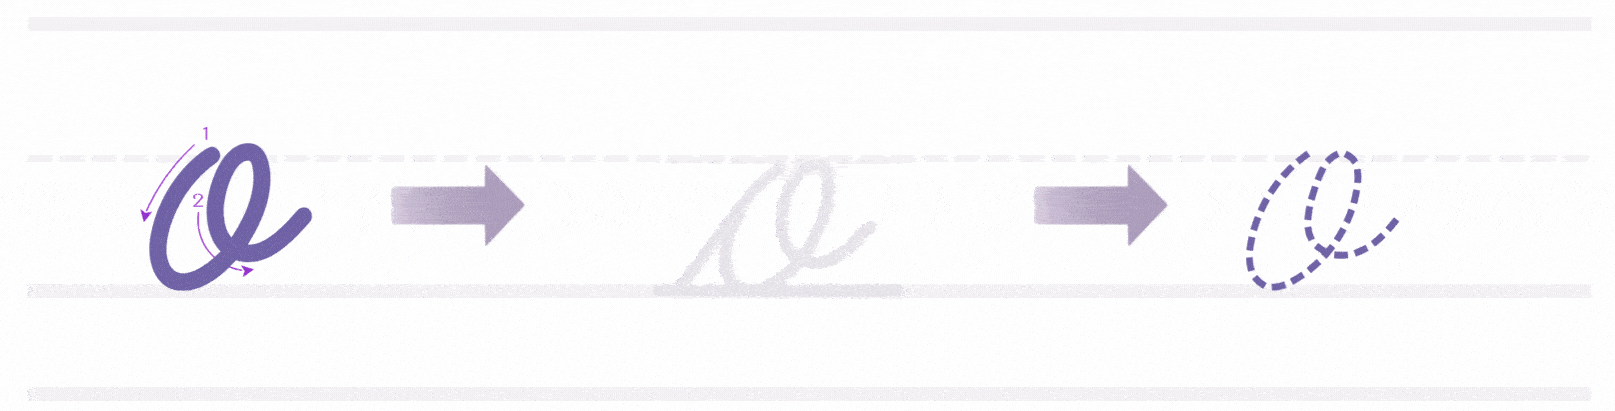
Start just below the midline Curve up to the midline, then swing left Continue down and around to cross the baseline Complete the oval by closing the loop at the starting point Finish with a short tail that curves right and rests on the baseline
How to Write Uppercase Cursive O
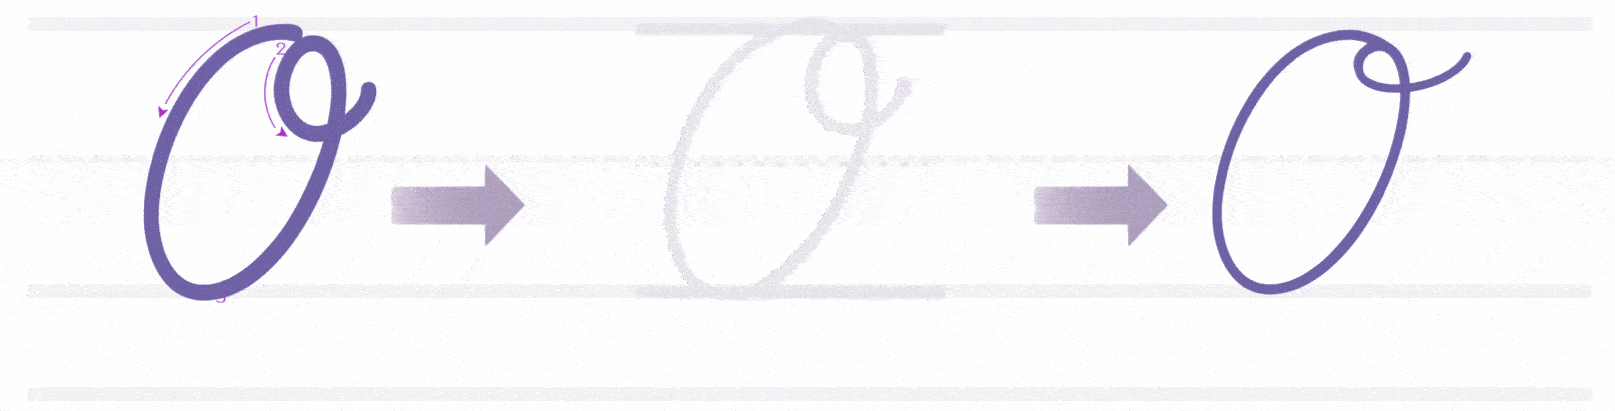
Begin on the baseline Curve up to the left and reach the top line Loop around to the right and curve down Finish by circling back to the left End at or near the top line, sometimes with a slight rightward curve
Cursive Letter “P” Training
Writing cursive P takes practice, but once you learn the movement, it becomes smooth and easy to repeat.
How to Write Lowercase Cursive P
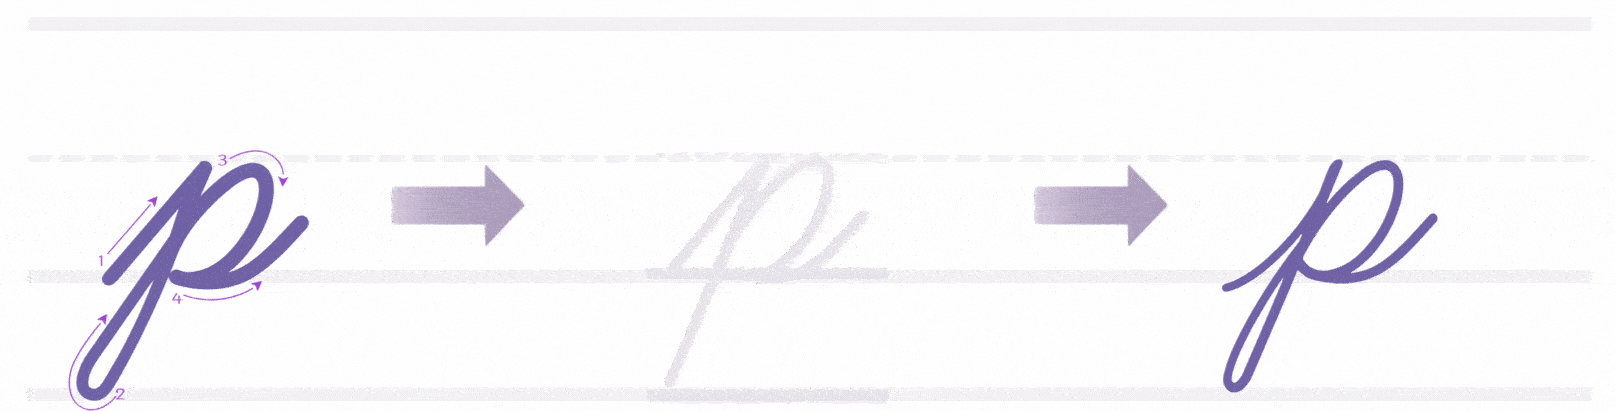
Begin at the midline Pull a straight stroke down through the baseline Curve back up to the midline to form a loop Without lifting your pencil, make a small round shape on the right End with a short exit stroke on the baseline to connect with the next letter
How to Write Uppercase Cursive P
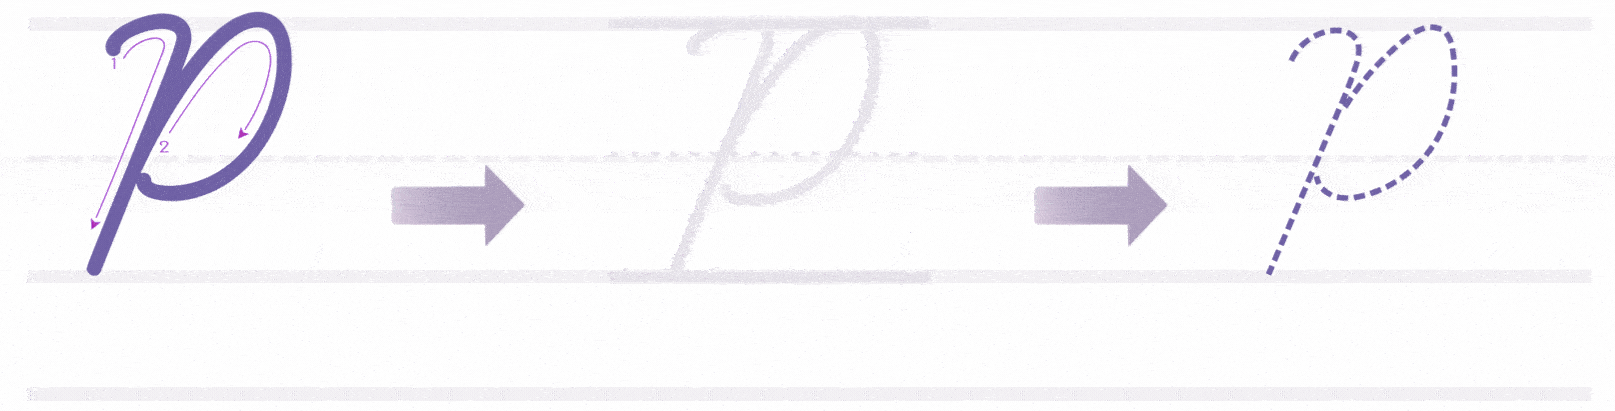
Begin at the top line Draw a straight vertical line down to the baseline Return to the top and form a round curve to the right Curve down and back toward the middle of the vertical line End by closing the loop at or near the midline
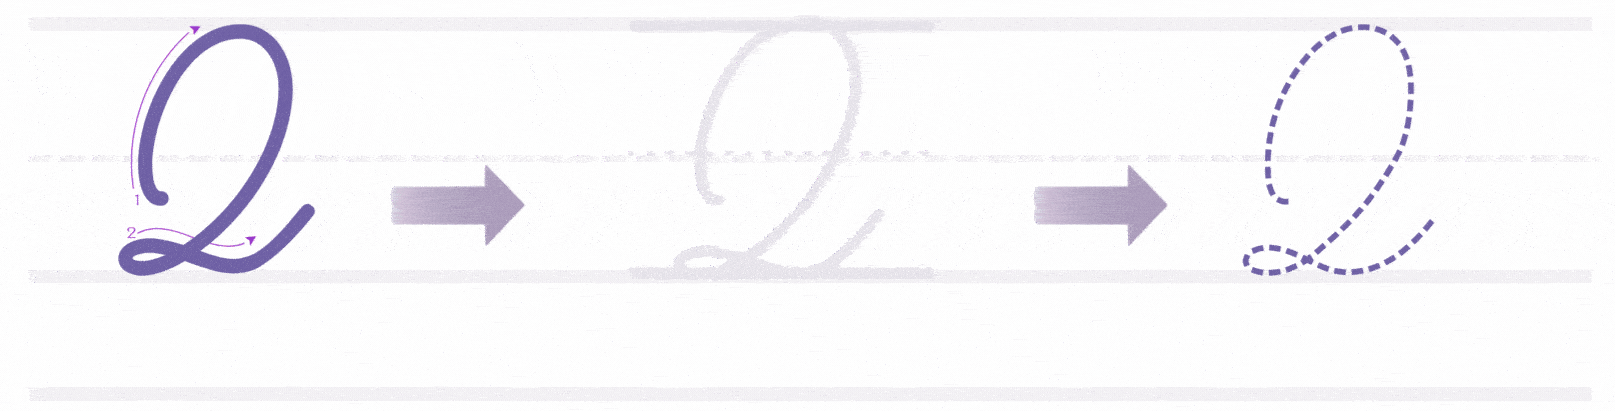
Cursive Letter “Q” Training
Cursive Q is shaped very differently from what most learners expect.
How to Write Lowercase Cursive Q
Start at the midline Curve up and to the right, then loop back left to form a shape like a cursive o From the midline, pull a straight stroke downward past the baseline Curve the tail right, forming a loop or hook just below the line End with a small upward stroke that leads into the next letter
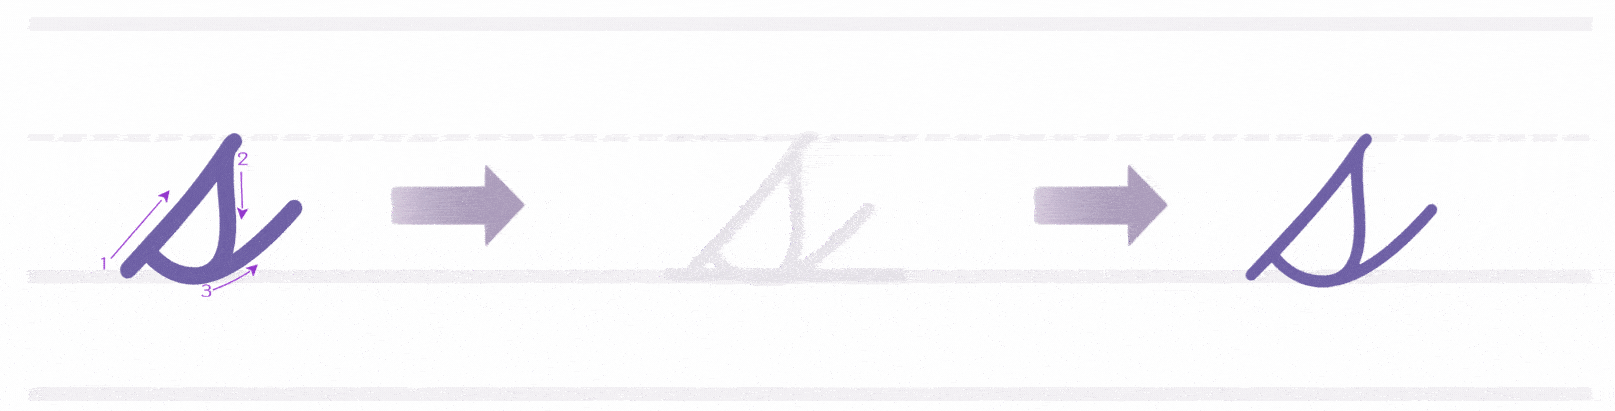
How to Write Uppercase Cursive Q
Start just below the midline Form a large oval by moving the stroke down, around to the left, and back up to the top line (like a cursive O) As you reach the top, add a small loop that curves right and slightly upward Pull the stroke downward, crossing the oval Finish with a small rightward hook that ends at the baseline
Cursive Letter “R” Training
Cursive R has its own rhythm. The lowercase form is quick and simple, while the uppercase one has a loop and diagonal tail that makes it stand out.
How to Write Lowercase Cursive R
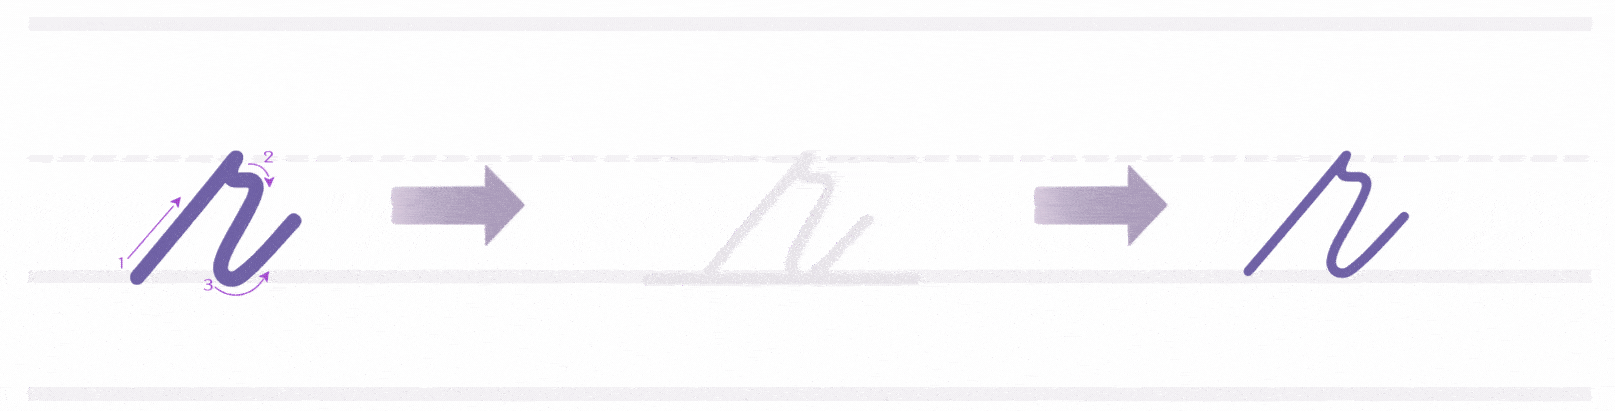
Begin at the baseline Make a straight upward stroke to the midline Curve slightly right, then pull the stroke back down to the midline Create a small arch that stays within the midline space Finish with a soft upward curve just above the midline to connect to the next letter
How to Write Uppercase Cursive R
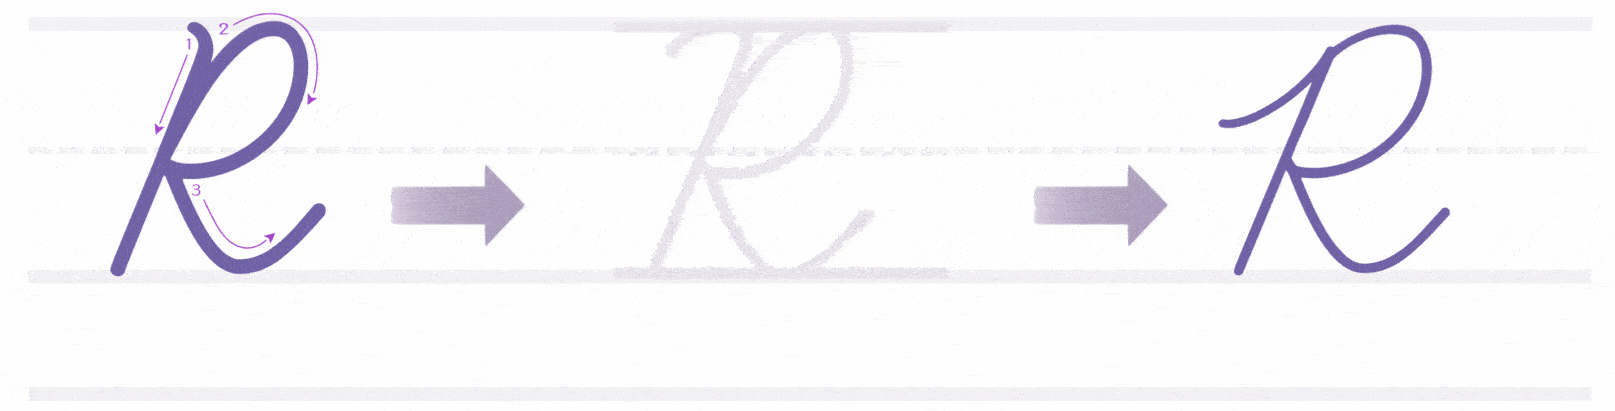
Start at the top line of the paper Curve up slightly, then pull a slanted stroke straight down to the baseline Without lifting, curve back up and to the right, forming a loop that touches the midline Loop back left, creating a shape like the top of a cursive P From just below the midline, add a diagonal stroke that crosses back to the right
Cursive Letter “S” Training
The cursive S has a soft, double-curve shape that makes it feel different from most other letters. It needs light hand control and clear direction.
How to Write Lowercase Cursive S
Start just below the midline Curve upward gently to touch the midline Loop back down to the left, crossing over the first stroke Curve around to the right, forming a small loop under the midline Continue the stroke down toward the baseline Finish with a small upward curve, just above the baseline, to connect to the next letter
How to Write Uppercase Cursive S
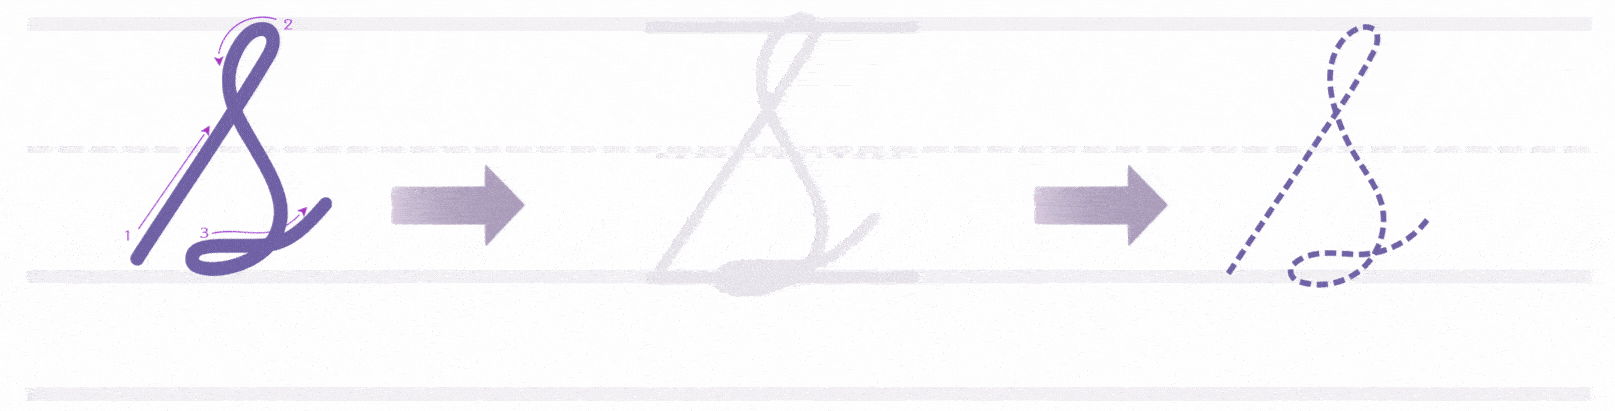
Start at the baseline Move up and to the right, forming a small curve that rises toward the midline Loop back to the left and curve downward into a wide lower loop Let the bottom loop reach down to the baseline Finish with a gentle upward tail if you want to connect to the next letter
Cursive Letter “T” Training
Cursive T has two forms each with its own style. The lowercase is simple and compact, while the uppercase is taller and more decorative.
How to Write Lowercase Cursive T
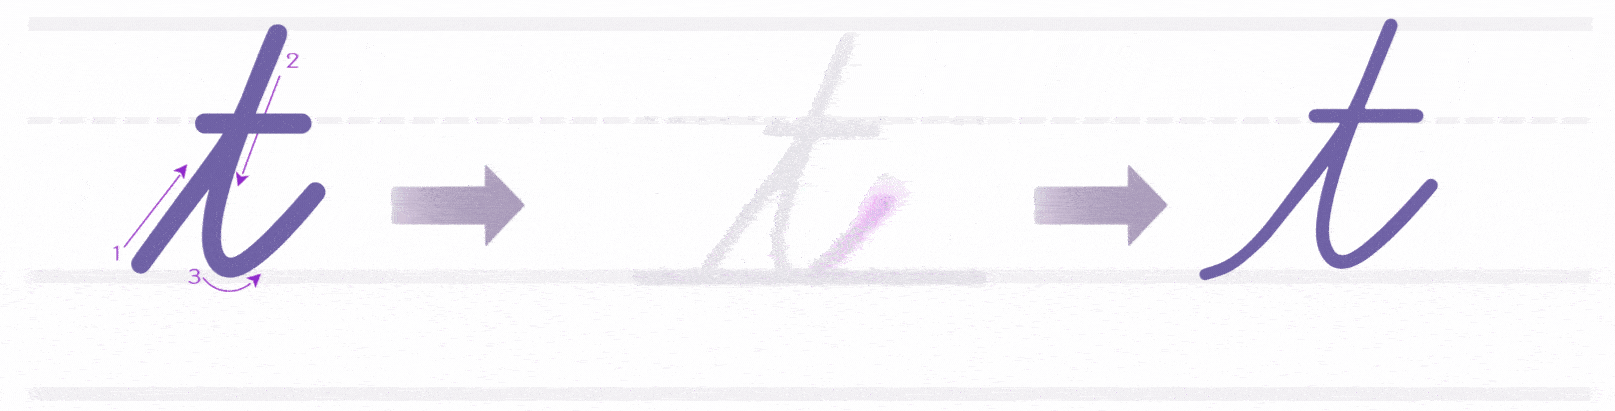
Start at the baseline Pull a straight stroke up to the top line Curve it slightly at the top, then come back down End with a small upward tail just above the baseline to connect Lift your pencil and draw a short crossbar near the top
How to Write Uppercase Cursive T
Start at the top line Pull a vertical stroke straight down to the baseline and lift your pencil Go back to the top line, just right of the downstroke Draw a wide curve to the left that crosses the vertical line Let the curve continue slightly to the right to finish the top stroke
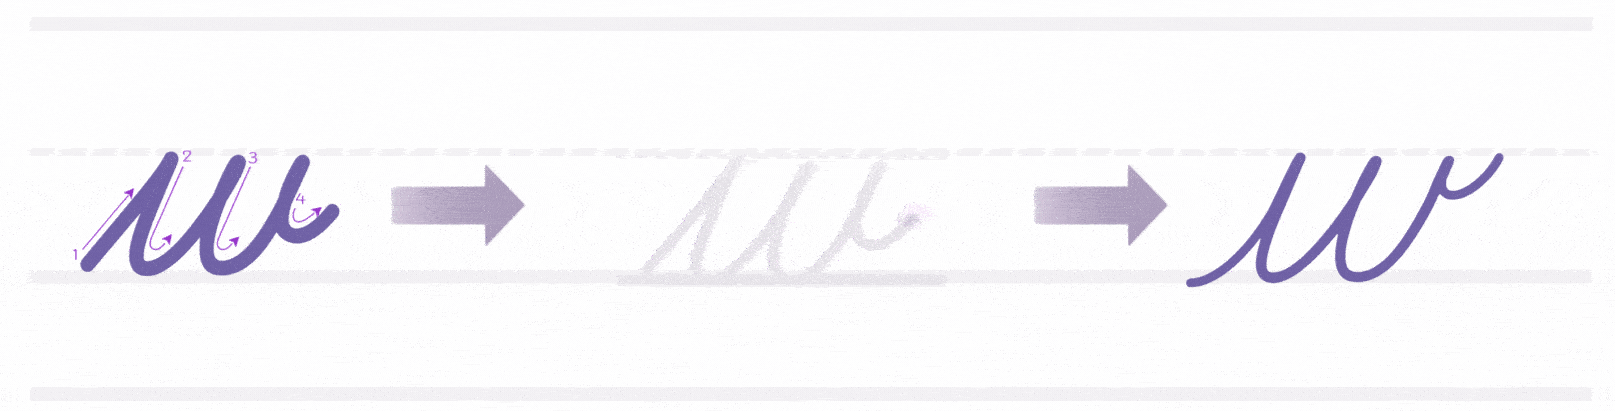
Cursive Letter “U” Training
The cursive U is simple and easy to master once you understand the motion. It uses smooth, curved strokes that keep the writing fluid.
How to Write Lowercase Cursive U
Begin at the bottom line Make an upward stroke to the midline Curve back down to the baseline to form the first downstroke Without lifting your pencil, go back up to the midline and curve down again End with a small right-leaning exit stroke just above the baseline
How to Write Uppercase Cursive U
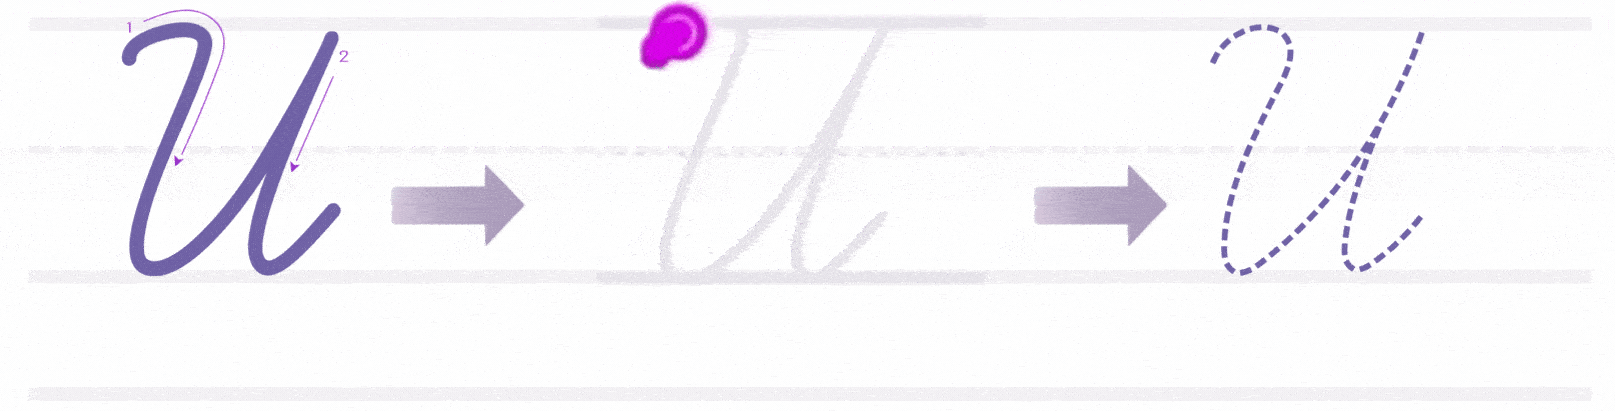
Start at the top line Pull a curved stroke down to the baseline, slightly bending to the left Then bring the stroke back up along the right side in a rounded motion As you return to the top line, dip down and create a gentle curve to the right to finish
Cursive Letter “V” Training
Cursive V stands out with its pointed shape and quick, angular motion. Both lowercase and uppercase forms use straight strokes, but they still connect smoothly in words.
How to Write Lowercase Cursive V
Begin at the bottom line Pull a slanted upward stroke to the midline Without pausing, bring the stroke back down to the bottom line, forming a sharp point Then, create a second upward stroke that reaches the midline again End with a soft curve to the right for connecting to the next letter
How to Write Uppercase Cursive V
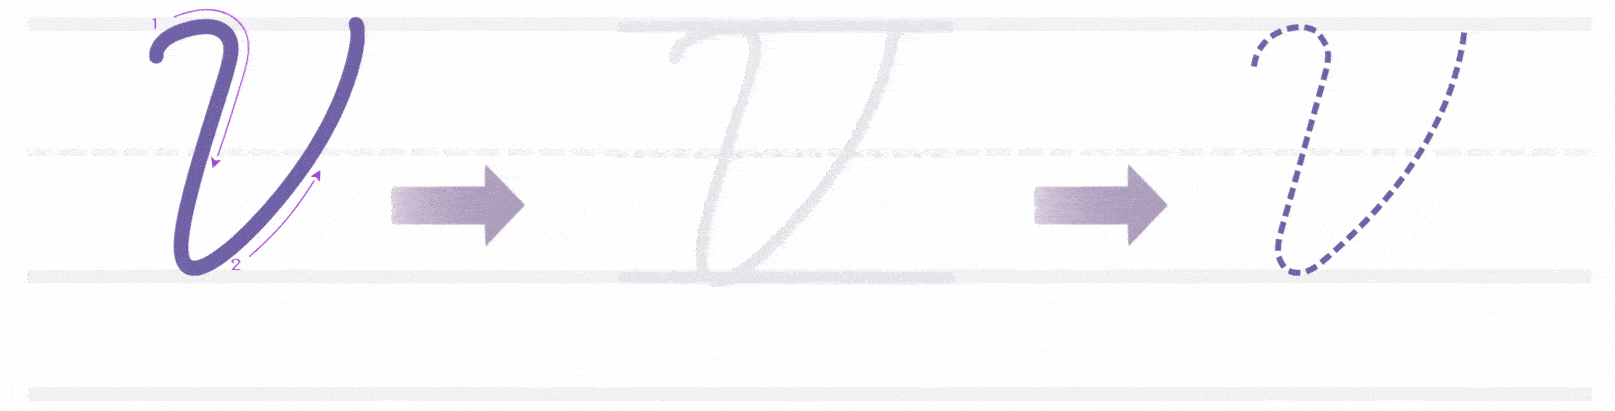
Start at the top line Draw a downward slant that reaches the bottom line At the bottom, curve slightly left, then swing the stroke upward to the top right The full stroke should form a wide “V” that looks clean and open
Cursive Letter “W” Training
Cursive W is written as two smooth curves joined together. It has no loops or sharp angles, but still needs clear spacing to look neat and readable.
How to Write Lowercase Cursive W
Start at the bottom line Make a slanted upward stroke to the midline Curve it down to the baseline — this is the first downstroke Without lifting your pencil, make another upward stroke to the midline Bring it down again to the baseline for the second downstroke Finish with a small upward curve for connection
How to Write Uppercase Cursive W
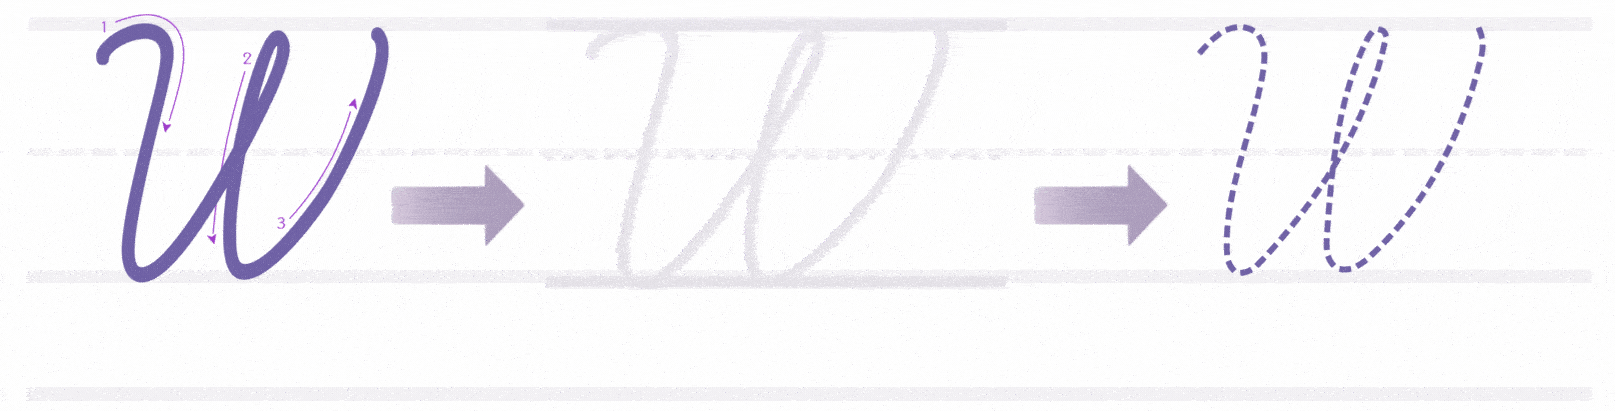
Begin at the top line Draw a small upward stroke, then a downward slant to the bottom line Curve up and right, touching the midline Curve the stroke down to the left and loop back up just below the midline Add a diagonal downstroke, then finish with a small exit curve if connecting
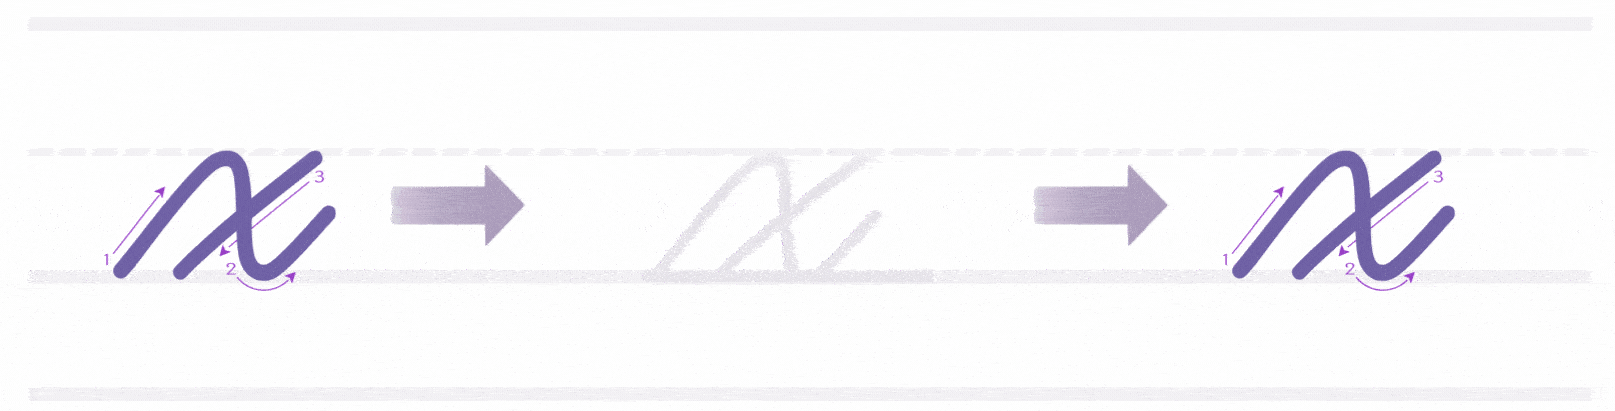
Cursive Letter “X” Training
Cursive X looks different from many other letters. It includes a crossing stroke and needs careful spacing to keep it readable and smooth.
How to Write Lowercase Cursive X
Start at the bottom line Slant upward to the midline Curve back down to the bottom line — this forms the first stroke Lift your pencil Return to the midline and draw a slanted stroke down to the left, crossing over the first stroke End with a short upward curve if you’re connecting
How to Write Uppercase Cursive X
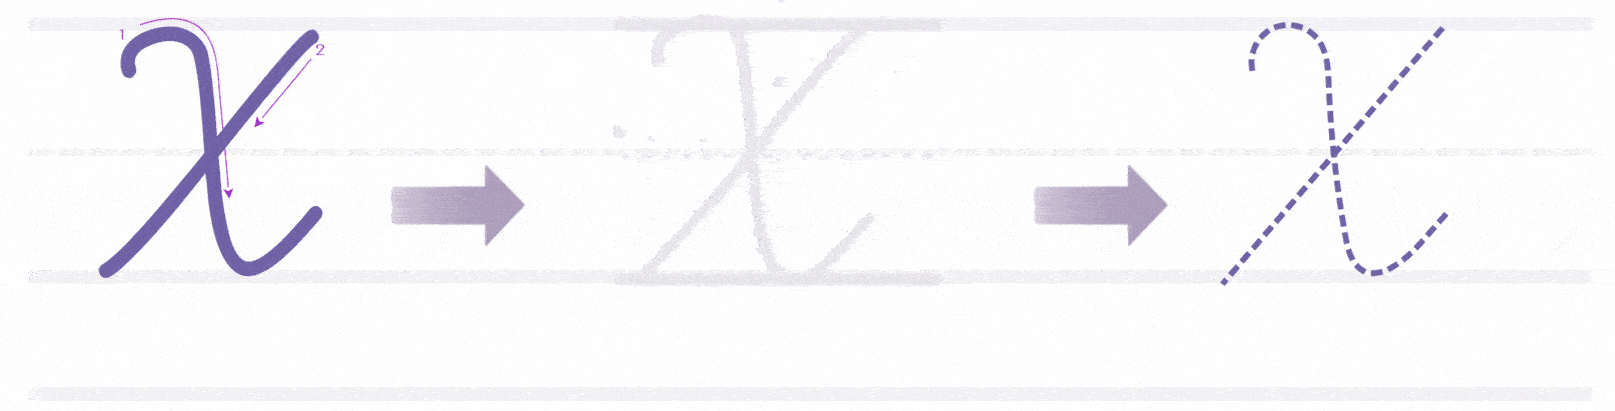
Begin at the top line Make a slanted downward stroke to the bottom line Curve slightly left as you go Lift your pencil Start just below the top line again Make a second slanted stroke that crosses the first, ending at the bottom right Add a small exit stroke if connecting to another letter
Cursive Letter “Y” Training
The cursive Y looks smooth and flowing but needs control, especially in the downstroke and tail. It’s important to balance height and length for legibility.
How to Write Lowercase Cursive Y
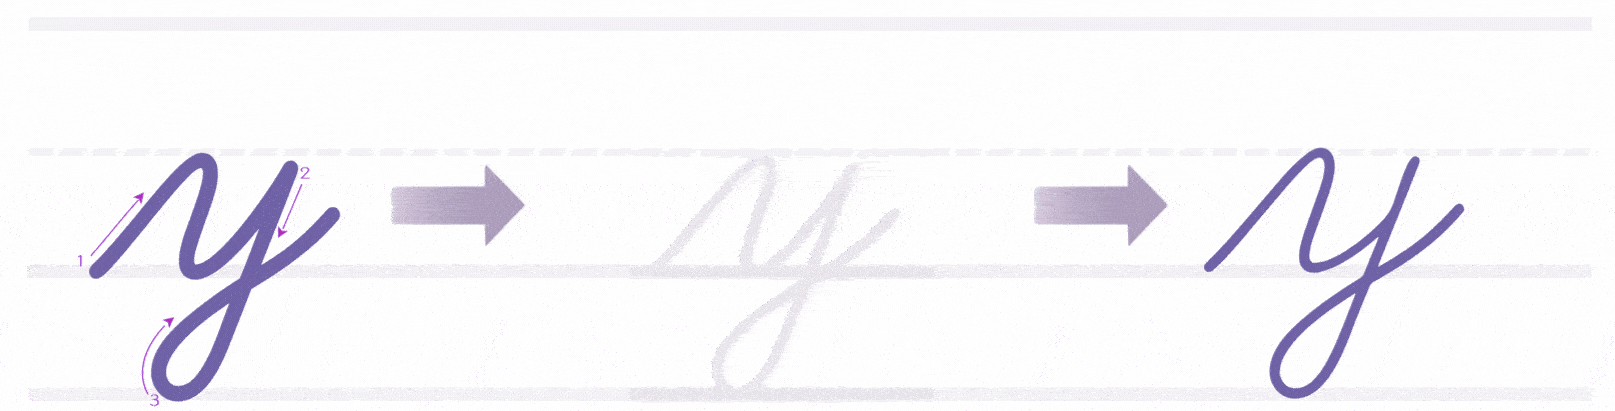
Start at the bottom line Curve up to the midline Loop back down to the bottom line in a slanted stroke Continue the stroke below the line, forming a tail that loops to the left End with a slight upward curve to prepare for the next letter
How to Write Uppercase Cursive Y
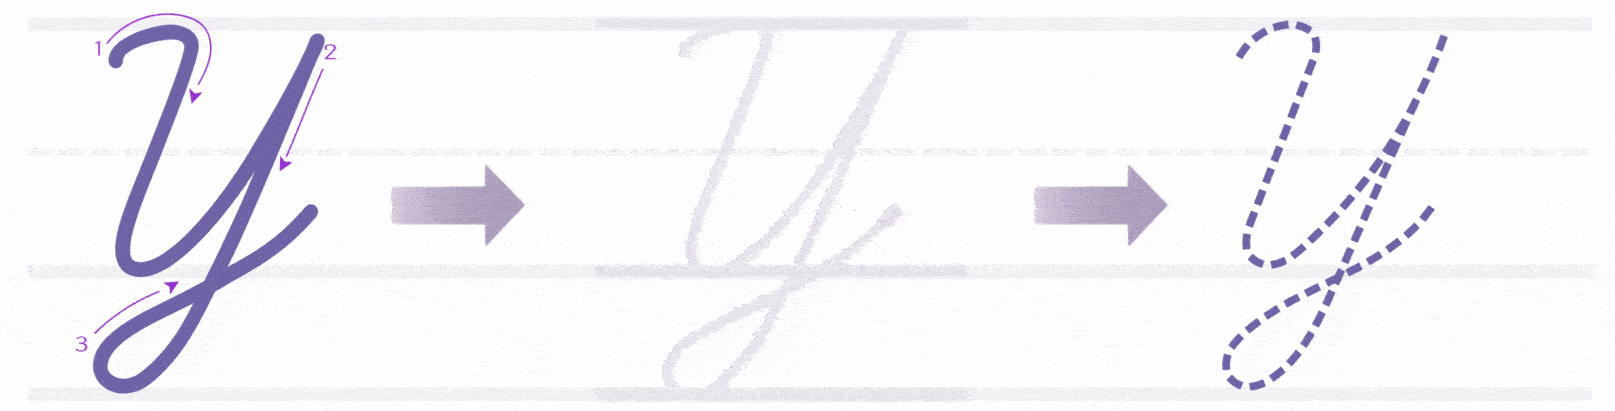
Begin at the top line Slant down to the midline with a smooth stroke Curve up slightly, then make a large loop that crosses down to the baseline Finish with a small hook or upward exit stroke
Cursive Letter “Z” Training
Cursive Z has a unique look. The lowercase version curves and loops, while the uppercase Z has sharp turns with a flowing style.
How to Write Lowercase Cursive Z
Start at the middle line. Make a slanted stroke down to the bottom line. Without lifting your pencil, curve the stroke back up into a small hook that touches the middle line. From there, slant the stroke down and to the left, ending just above the bottom line. Finish with a soft upward curve so it can connect to the next letter.
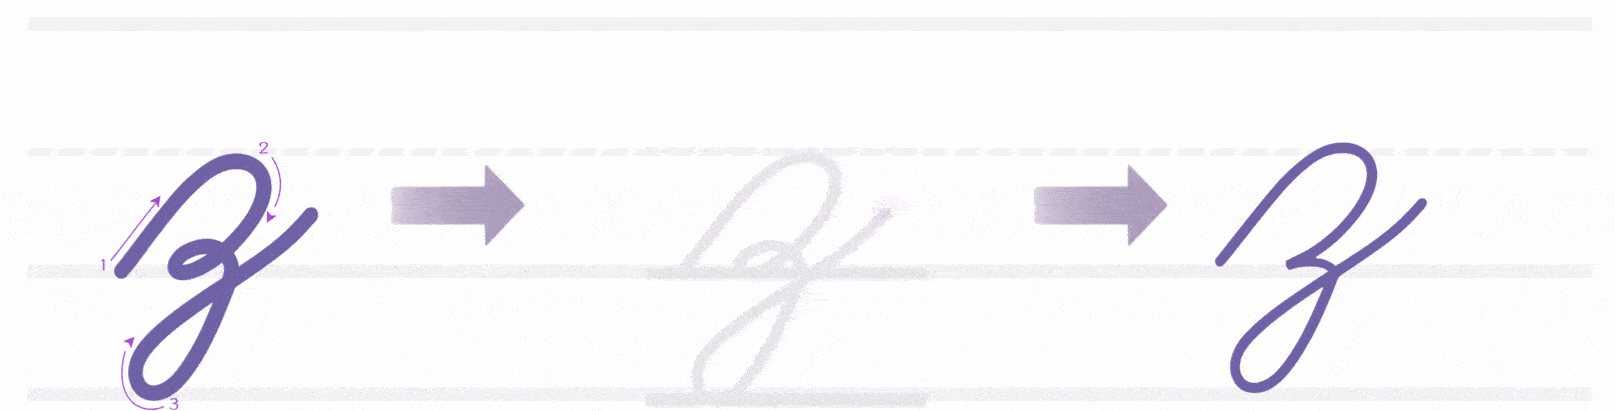
How to Write Uppercase Cursive Z
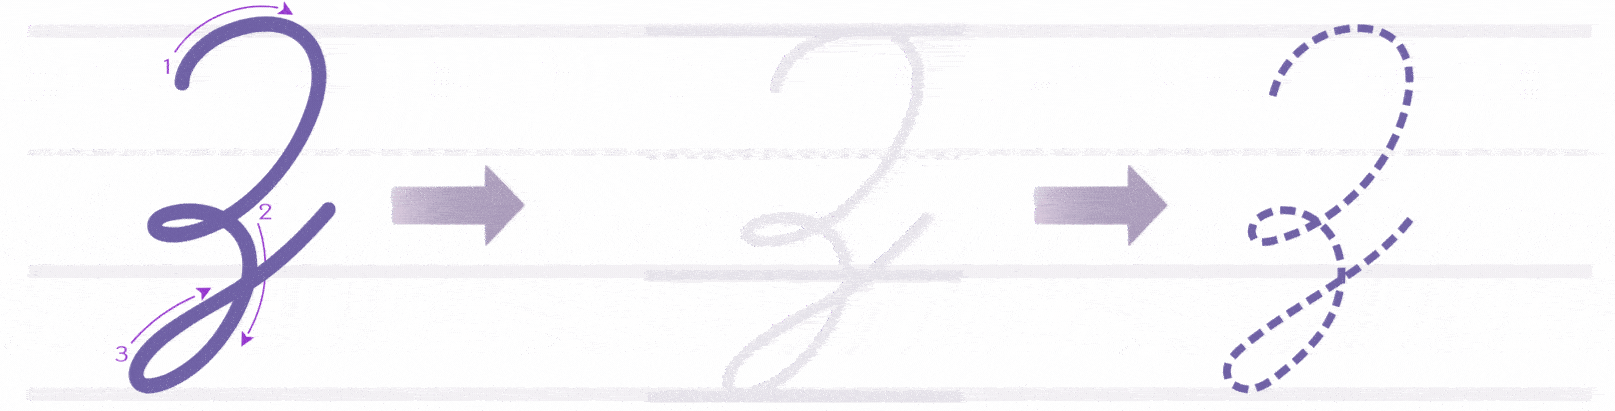
Start at the top line. Make a slanted stroke down to the bottom line. Curve the stroke back up into a small hook that returns to the top line. Then slant down and to the left, crossing over your first stroke. Finish with a small upward curve to prepare for the next letter.
Lowercase vs Uppercase Cursive Letters
Lowercase and uppercase cursive letters follow different stroke patterns and spacing rules. Understanding the difference helps improve both speed and accuracy in cursive writing.
| Feature | Lowercase Cursive Letters | Uppercase Cursive Letters |
|---|---|---|
| Size | Smaller; stay between base and middle line | Taller; often reach the top line |
| Stroke Style | Smooth, continuous strokes | May have loops, hooks, or extra flourishes |
| Connection to Next Letter | Usually connect to the next letter | Often do not connect |
| Stroke Count | Usually one single stroke | May require lifting the pencil |
| Learning Order | Taught first for easier flow and repetition | Taught after lowercase is mastered |
| Letter Shape | Similar to print in many cases | Often look very different from print (e.g., G, Q) |
Common Mistakes to Avoid in Cursive Writing
Learning cursive takes practice, and some mistakes can slow progress if they aren’t corrected early. Knowing what to watch for helps keep your writing neat and readable.
1. Letters Not Connecting Properly
Cursive letters should join smoothly. If the pencil lifts too soon or the strokes don’t flow, the writing can look broken or uneven.
2. Uneven Slant
Cursive writing should slant slightly to the right. Switching angles mid-word makes the writing look messy and harder to read.
3. Incorrect Starting Points
Each letter has a proper place to begin. Starting too high or low throws off the shape and spacing.
4. Overlapping Letters
Letters should touch, not stack or crowd each other. Keep spacing even so every word is clear.
5. Rushing the Strokes
Speed comes later. Focus on control and form first. Slow, steady strokes help you build accuracy and consistency.
Printable Cursive Alphabet Worksheets
Printable cursive worksheets are one of the easiest ways to improve your writing. They give you clear lines, guided strokes, and plenty of space to trace and copy each letter.
You can start with full cursive alphabet worksheets that show both uppercase and lowercase letters from A to Z. These help you get familiar with letter shapes, spacing, and slant. Tracing letters a few times before writing them on your own helps build confidence and control.
For extra practice, use custom sheets made with a cursive worksheet generator. This lets you type your own words like your name, spelling lists, or short sentences and turn them into dotted writing lines. It’s perfect for daily practice and can be printed anytime.
I am definitely seeking for new information on this crucial
topic, and am especially ecstatic when I find websites that happen to be well-written and well-researched.
Thanks for offering this kind of excellent information, and i also
take a look onward to learning much more out of the weblog in the long term future.